Electric Water Heater Installation: Step-by-Step Guide
Key Takeaways
-
Evaluate your household’s hot water needs, compare different electric water heater models, and ensure the installation site meets safety, space, and accessibility requirements.
-
Be sure to review local building codes, get any required permits, and follow manufacturer guidelines for a safe, legal installation.
-
Lay out all your tools and safety equipment before beginning, disconnect power and plumbing cautiously, and make certain the new unit is secure, level and accessible for servicing.
-
Employ proper wire gauge and fasten all electrical connections in accordance with safety standards and the manufacturer’s specifications, to minimize the potential for electrical danger.
-
Don’t make the mistakes of undersizing/oversizing the unit, improper wiring, forgetting the relief valve etc.
-
Plan seasonal tune ups, discover energy saving smart features and use troubleshooting tips to get the most from your electric water heater.
Electric water heater installation refers to the process of installing an electric-powered water heater to provide hot water for residential or commercial use. These heaters utilize electricity to heat water quickly and maintain a consistent temperature. A lot of folks opt for electric versions because they are compatible with the majority of home configurations, have a lower initial expense and require less maintenance than gas variants. Popular options are tank and tankless, both having their respective application and dimension for tiny flats or larger homes. Prior to beginning, it does assist to understand the power requirements, safety procedures, and spatial guidelines. The heart of this guide displays each step, required tools, and advice for safe and efficient work.
Site Preparation
Site preparation is the backbone of a secure and effective electric water heater installation. A good spot facilitates maintenance and repairs, reduces hazard and increases the system’s longevity. The location must have unobstructed airflow, be in proximity to plumbing and wiring, and provide sufficient room for subsequent inspections. A level, strong floor is crucial to supporting the unit’s weight. Always include a discharge pipe near a drain to maintain safety and dryness.
Unit Selection
|
Type |
Energy Efficiency |
Warranty Options |
|---|---|---|
|
Electric Tank |
Medium |
5–10 years, some limited |
|
Electric Tankless |
High |
7–12 years, some lifetime |
|
Heat Pump |
Very High |
5–10 years, some extended |
Select a water heater appropriate for your location and usage. Electric tankless and heat pump models, for instance, consume less energy and reduce power bills in the long run. Watch each unit’s energy efficiency rating—better ratings can translate into bigger savings, particularly in areas with high electricity prices. Explore warranty possibilities that align with your desires, units with extended or even lifetime coverage alleviate the concerns of expensive repairs in the future. Fit the heater’s thermal storage to your daily hot water usage, so you never run out during peak periods.
Location Check
Your intended location should provide space on every side for air to drift and heat to dissipate as a safeguard against overheating. It needs to be near water lines and a corresponding electrical circuit, typically 240 volts, for an easy hook-up. Be sure there is room for a drain or a discharge pipe terminating just above the floor. This prevents water damage during valve discharges or leaks. The space should be clear of blocks such as pipes, shelving, or pallets of inventory that might interfere with repairing or replacing the heater.
Code Compliance
Local building codes are the law for any installation. Prior to beginning any work, review these codes and obtain all required permits to avoid fines and delays. Follow the manufacturer’s directions, too, because skipping a step can invalidate warranties and be dangerous. If regulations appear fuzzy, a brief call or trip to your local agency can spare time and grief.
Tool Checklist
Gather these tools: screwdriver, wrench, voltage tester, pipe tape, pliers, and a drill. Keep gloves and goggles handy at all times. A hose or bucket manages water while unhooking the old unit. Check your list two times before you begin.
Installation Process
Installing an electric water heater requires a strategic mindset. It’s an installation adventure, complete with power disconnect, draining the old unit, system disconnections, and careful installation and connection of the new heater. Every one of those steps deserves its own series of posts because there are important considerations like local codes, proper tools, and manufacturer instructions.
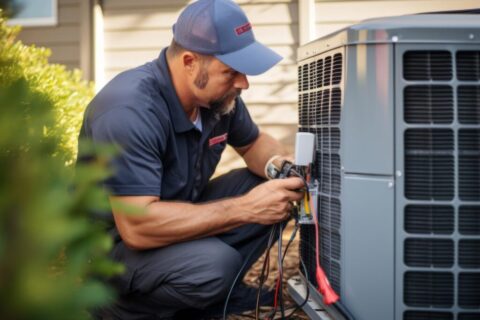
1. Power Disconnection
Turn off the circuit breaker for the water heater. Use a voltage tester to reconfirm there is no current left going to the unit. It’s a good idea to tag wires and connections prior to unplugging anything. This simplifies connecting the new unit later, particularly if a number of the wires appear similar.
In all cases, observe common safety protocols to reduce the possibility of an electrical shock. Gloves and insulated tools are mandatory. This is not optional, it’s crucial for anyone’s personal safety during the installation.
2. Old Unit Drainage
Connect a garden hose to the drain valve, leading it outside or into a big bucket. Turn on the valve and allow the water to drain completely. This avoids spills and makes the old unit easier to carry.
Check for leaks or rust around the valve, as these may indicate bigger issues. Once it’s empty, dispose of the old heater according to local waste regulations. Certain locations have special recycling centers for these devices, so inquire before.
3. System Disconnection
Disconnect the cold water inlet and hot flow. Disconnect all wiring, ensuring wires are capped or taped securely. Jot down notes or take pictures of how pipes and wires are configured—this is a big help when installing the new heater.
Don’t be the contractor who strips pipes or breaks fittings with a poorly sized wrench. If you rush this step, it can translate into extra work or leaks down the road.
4. New Unit Placement
Position the new water heater, ensuring it’s level and rests on a solid surface. A drain pan must be at least 2 inches wider than the heater. Leave at least 6 inches clear all around for ventilation.
Line up the water inlets and outlets with your old plumbing lines. Hold tank from shifting
5. Plumbing Connection
Connect the cold water line to the new heater’s inlet. Connect the hot water pipe to the outlet. Wrap pipe insulation to reduce heat loss and increase efficiency. T&P valve discharge only – Use copper or CPVC pipes.
Install fittings or valves where necessary, such as check valves to prevent backflow.
6. System Filling
Open the cold water valve and allow the tank to fill at a slow rate. Inspect all joints for leaks. Flush the tank for 3 minutes to clear air and debris. Ensure pressure is under 80-PSI and the tank is threaded tight to the T fitting.
Turn the dial to 120 degrees F according to the manual. In case a tap runs dry, remove the aerator and flush to blow out sediment.
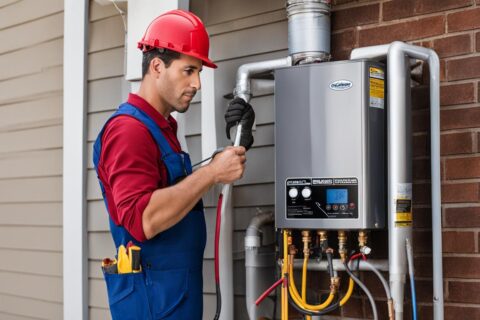
Electrical Connection
Electric water heater wiring requires thought of electrical so as to maintain it safe and up to code. Every procedure, from verifying the electrical connection to tightening the last cable, contributes to operating excellence and tranquility.
Circuit Requirements
See if your circuit breaker can handle your heater’s load. Even most conventional electric units, with their two 4500-watt elements, require a 30-amp circuit and 10-gauge wiring. A 20-amp circuit might seem okay initially, but it generally won’t get the job done or pass code for full-size units.
A dedicated circuit is ideal. This prevents the heater from distributing power to other appliances and minimizes overload risk. Section 422.13 of the NEC says the circuit must be rated at 125% of the water heaters rating. For instance, if your unit pulls 20 amps, then multiply by 1.25 to get to the correct breaker sizing. Smaller, 120-volt heaters may use less, but always verify.
Rules vary by region. Always check your local electrical code for any additional regulations about water heater circuits. Mark up the breaker well—future fixes are simpler and safer with a labeled box.
Wire Gauging
Select wire size based on the amperage and distance from your panel. For the majority of homes, 10-gauge wire is standard with a 30-amp circuit. If your heater is a good distance from the panel, utilize a voltage drop calculator to confirm you’re not dropping power over distance.
Never wire little wires on big tasks. Underspecified wires can overheat and ignite a fire. Stick with what your manufacturer says to preserve your warranty and your safety.
Final Hookup
Begin by mating each power wire to the proper terminal block location, according to your heater’s wiring diagram. All connections should be tight, with no bare wire showing. Cap them with wire nuts, then finish it off with a nice, clean electrical cover plate. This keeps wetness and hands from live parts.
Double check every wire before powering up. If there’s a service disconnect, ensure that it’s in sight from the heater. This may be a breaker or a wall switch, but it MUST be close by for safety.
Safety Essentials
All wires to the heater require protection. A service disconnect is mandatory. It allows you to power down rapidly for maintenance.
Mark everything, breaker to disconnect, to assist anyone performing maintanence down the road.
Don’t bypass code inspections. Comply with all NEC and local regulations.
Common Pitfalls
Electric water heater installation appears straightforward. However, there are numerous common blunders that result in bad or even hazardous performance.
-
Selecting the incorrect size unit, resulting in either hot water shortages or energy waste
-
Bypassing local safety codes or not installing relief valves
-
Not checking for leaks at fittings, valves, or connections
-
Using incompatible piping materials, risking corrosion or leaks
-
Leaving the unit unsecured, which raises flood and damage risks
-
Installing the heater in a hard-to-access location for repairs or maintenance.
-
Wiring mistakes or using worn, damaged components
-
Dry firing the tank prior to fill-up, destroying the unit
-
Soldering pipes too near the tank, endangering it with fire or damage.
Improper Sizing
-
Calculate peak hour hot water demand by aggregating L/min for showers, sinks and appliances during the busiest hour.
-
Consult manufacturer sizing guides to align demand with the appropriate size tank.
-
Add 5–10% buffer for surprise usage.
Small water heaters tend to run out of hot water quickly. Units that are too large consume excess energy and are more expensive to operate. A washing machine that’s the right size for your needs conserves electricity and stabilizes energy bills. By consulting an expert or leveraging a trusted calculator, you bypass this guess work and nail the perfect fit for your home.
Faulty Wiring
Inspect all cords for obvious damage, loose terminals or bare wires PRIOR to energizing. Good insulation is important because it prevents shorts or shocks. Each wire must be snug and undamaged.
Check the water heater’s wiring once installed. This step helps identify wiring problems prior to everyday use. Don’t ever disregard small wiring faults, either. Patching them immediately keeps your install secure and stable.
Leakage Risks
-
Check drain valves, all fittings and joints, for corrosion or cracks.
-
Use Teflon tape or pipe joint compound on threaded connections.
-
Be aware of leaks in the first days.
Check for water drops, rust or moisture around valves and joints. Untended leaks can result in more significant issues such as mold or tank failure.
Neglecting Relief Valves
Fit a temperature and pressure relief valve to the tank.
Test the relief valve regularly.
Always include a discharge pipe to direct released water to a safe location!
Follow all manufacturer instructions for safe use.
DIY vs. Professional
DIY vs. Professional Electric Water Heater Installation – Cost, Safety, Warranties & Time. The right answer for you depends on your abilities, local regulations, and the value you place on peace of mind.
|
Aspect |
DIY Installation |
Professional Installation |
|---|---|---|
|
Cost |
Lower upfront, possible higher long-term |
Higher upfront, fewer hidden costs |
|
Safety |
Higher risk, dependent on skill |
Lower risk, follows codes and best practice |
|
Warranty |
May void warranty if not done properly |
Usually keeps warranty valid |
|
Time |
4-8 hours or more, plus learning curve |
2-6 hours, often faster |
Cost
DIY install appears less expensive since you don’t pay labor. You have to purchase or rent tools and little errors can add up to huge repair bills down the road. Certain energy-saving models might even help save money in the long run — a bad DIY job could potentially offset those savings.
Professional fees, usually $1,000-$3,000, pay for experience and a job well done. You sidestep the danger of concealed expenses from errors or code breaches. Long-term, doing it right the first time can translate into lower repair and maintenance bills.
Safety
There are grave dangers in dealing with electrical and plumbing. If untrained, you could encounter shocks, leaks or even fires. Protective equipment such as gloves and goggles assist, however they won’t substitute expert hands.
Local codes and manufacturer guides are there for a reason. Following them reduces risks. Professionals understand to keep your home safe and up to code, which is critical for any installation tied to water and power.
Warranty
Warranties don’t always extend to DIY screwups. A lot of brands say in their terms that only pro work maintains the warranty. If you do the DIY route, save your receipts and photograph to substantiate any claims.
Certified installers usually provide a workmanship warranty. This provides coverage on top of the manufacturer’s warranty–convenient should issues arise down the road.
Time
DIY projects gobble time for research, setup and cleanup. Should take at least half a day or more, particularly if you encounter snags.
A pro job is faster, completed in 2-6 hours. Delays less likely, and you escape the stress of debugging.
Post-Installation Care
Post-installation care following an electric water heater installation is the best way to prevent issues and ensure that it continues to operate efficiently. Caring for your unit in terms of startup, smart tech, regular service and basic troubleshooting can make your unit last and work for years.
Initial Startup
Upon initial startup of the heater, adjust the thermostat to a desired temperature, typically 50°C – 60°C for safety and comfort. This step reduces scalding and energy waste.
Next, let the tank fill before powering on. Keep an eye out for leaks around the inlet, outlet, and heating element. Even minor drips need to be repaired immediately, as they can result in serious problems.
See how the heater scalds the water on initial draw. Check to see if the lights or digital displays indicate an error. Once the tank reaches the desired heat, test a few taps to ensure hot water flows clear and consistent. If the water is cold or cloudy or smells funny, turn off the unit and read the manual.
Smart Features
A lot of newer water heaters have smart controls that can link to apps or your home network. These allow you adjust temperature, program timers, and monitor energy consumption from your phone.
Smart features can help you program the heater to your schedule, so you don’t waste power heating water you won’t use. They display daily or weekly reports, assisting you in identifying trends or usage spikes.
If you receive notifications for software updates, install them in order to maintain the system’s security and functionality.
First Maintenance
Schedule the initial tune-up for 6 months. Flush the tank to clear out sediment, which reduces the efficiency of the heater.
Inspect the anode rod and replace it if it’s rusted. Inspect valves and joints for leakage, tightening any that feel loose.
Troubleshooting
Discover common steps such as resetting the unit or checking circuit breakers.
Read the manual for tips on fixing simple issues.
Keep a plumber’s number close for bigger problems.
Write down repeat faults to help get faster fixes.
Conclusion
Installation of an electric water heater requires a bit of time, but the process remains straightforward. Prep the location, install according to steps, secure wiring connections and test for leaks. Look out for little oversights such as loose pipes or incorrect wire connections. Repairing these quick keeps water warm and secure. Sure, you can go it alone, but a professional will catch things you’d overlook. Watch the heater post first run. Clear it, test cables, and hear for strange noise. Little repairs today save huge expenses down the road. For reassurance, contact a reliable specialist if you’re unsure or want to double-check. Prepared to keep warm and safe! Go make that next step.
Frequently Asked Questions
What are the main steps for installing an electric water heater?
First, prep the site and ventilate. Put the heater in place following the manufacturer’s directions. Hook up the electricity, fill up the tank, and test for leaks prior to powering on.
Can I install an electric water heater myself?
Sure, if you’re a basic electrician/plumber. Though, having a licensed electrician come out couldn’t hurt to be safe and comply with local codes.
What electrical requirements should I consider?
Be sure your house electrical matches the water heater’s voltage and amperage. Install it on a dedicated circuit with correct wiring as recommended in the product manual.
What are common mistakes during installation?
Typical errors consist of using an incorrect wire size, omitting pressure relief valves, or failing to ground the unit. These mistakes have the potential to cause danger or invalidate a warranty.
How do I maintain an electric water heater after installation?
Periodically inspect for leaks, test the pressure relief valve, and flush mineral deposits from the tank. Stick to the manufacturer’s maintenance schedule.
What are the risks of improper installation?
A bad installation may result in electrical hazards, water leaks, inefficient heating, or potentially void the warranty. Always heed directions or call a pro.
Is a professional installation more beneficial than DIY?
An expert guarantees safety, correct installation and code compliance. This could save you time, avoid errors, and safeguard your investment for the long haul.
Key Takeaways
A new high-efficiency furnace installation can decrease your energy bills, deliver more consistent heat, and minimize your…
Key Takeaways
Make sure you correctly evaluate your household’s hot water requirements and follow your local codes prior to installing a…