Installation and Upkeep of Ductless Mini-Split Systems in Littleton, CO
Key Takeaways
-
Ductless mini splits deliver efficient, zoned cooling with no ductwork, reducing energy loss and allowing for customized temperature settings in each room. Use zoned controls to condition only the rooms that are being used and save on your utilities.
-
Littleton’s unique climate, variety of home styles and higher altitude set ductless AC as the practical option for dependable performance during those crazy temperature swings and those ductless homes. Opt for systems with inverter technology and refrigerant calibrated for altitude.
-
Proper installation matters for safety and efficiency, so work with licensed local contractors who handle site assessment, placement, electrical needs, permitting, and final testing. Verify they follow local codes and confirm warranty coverage.
-
Properly size systems to match room area and insulation to prevent wasteful oversizing or undersizing. Utilize accurate load calculations and indoor unit count for multi-zone installations.
-
Anticipate reduced long-term operating costs but variable upfront expenses depending on equipment, labor, and installation difficulty. See if there are any local rebates or incentives to counter initial investment.
-
Keep up with routine servicing and timely repairs to combat local elements like dust and altitude wear. Situate indoor and outdoor units for peak airflow, whisper-quiet operation and less work.
Ductless AC install Littleton means installing mini-split heating and cooling systems in residences and small businesses in Littleton. These units provide focused temperature control, silent operation, and efficiency advantages over ductwork extensions.
Installation takes anywhere from 2 to 6 hours per indoor unit and employs small exterior refrigerant lines. Prices depend on capacity and installation complexity, but are often quoted per room with transparent upfront quotes.
Ductless Systems
Ductless systems offer targeted cooling and heating without the hassle of ducts, a convenient solution for homes and buildings alike. They blow conditioned air into a room through a small indoor blower unit while an outdoor condensing unit sits outside. This arrangement eliminates the energy loss associated with ducts and keeps installation easier and less intrusive.
Ductless units provide rapid cooling or heating because the indoor blower sends conditioned air directly to where it is needed. The indoor unit is slim and unobtrusive, mounting high on a wall or in a ceiling cassette, and does not require that big, ugly hole in the wall or window slot.
That makes ductless a compelling choice for post-construction additions, older-in-style homes with no central HVAC, or spaces in which running ductwork would be expensive or infeasible.
Mini split systems are designed for zone control. Each indoor blower has its own thermostat or controller, allowing some occupants to set different temperatures in rooms. One outdoor condenser can be connected to multiple blowers indoors.
Multi-zone systems can have up to six indoor units connected to a single outdoor unit. This allows homes to warm just the rooms being occupied, minimizing waste and reducing operating costs. Current ductless systems’ SEERs approach 30 in some models, indicating high efficiency and lower bills than many older central systems.
Maintenance requirements are minimal. Indoor filters are accessible and easy to clean. Periodic inspections of the outdoor unit and refrigerant lines keep the system humming.
Ductless systems eschew duct cleaning, leakage checks, and larger filter swaps that central systems demand. They run quietly. Manufacturers engineer indoor blowers to hum at low volumes, keeping bedrooms and work spaces quiet.
These systems work great in the cold. Several of the ductless models provide substantial heating capacity even when outdoor temperatures drop below freezing, allowing them to be viable in chillier climates where heat pumps used to falter.
Installation consists of hanging the indoor unit, positioning the outdoor condenser, and passing a small refrigerant line and electrical conduit through a clean, slim hole.
Key advantages:
-
Fast, room-level heating and cooling
-
High efficiency, often up to 30+ SEER
-
Zoned control for personalized comfort
-
Low operating costs and simple maintenance
-
Quiet indoor operation and discreet indoor units
-
Functions in ductless homes and in cold climates as well
-
Multi-zone configurations accommodate multiple indoor units to one outdoor condenser.
Why Littleton?
Littleton’s combination of mountain-front weather, varied home styles, and higher elevation makes the argument for ductless AC. Right sizing, cold-climate models, and regular maintenance are key here. Local building codes and HOA rules impact where outdoor units go and how they look, so local expertise counts pre-install.
1. Local Climate
Littleton has hot summers and cold winters that swing within a single day, so systems must transition from cooling to heating rapidly. Ductless mini splits provide that flexibility by operating in both heat and cool modes with no extended warm-up periods.
Typical summer daytime highs are in the mid-20s to low-30s °C and winter lows can drop below freezing. Tuning system setpoints to these ranges maintains indoor comfort stability.
Sudden storms give older systems a stress test. Ductless units keep an even output and bounce back quicker after a temperature swing. Frosting and defrost cycles may manifest in winter, which is typical for heat pumps at altitude, but lingering ice warns of incorrect refrigerant charge or air flow issues, so schedule routine inspections.
2. Home Styles
Littleton homes vary from historic homes with compact floor plans to new builds with open layouts. Many of the older homes do not even have ductwork.
Ductless mini split systems adapt well; wall, floor, or ceiling cassettes fit varied interiors without major remodeling. For townhomes, condos, and split-level houses, mini splits provide low invasiveness and room-by-room control.
Multiple indoor units attach to one outside compressor, so you can zone living rooms, bedrooms, and offices separately. Space constraints can rule out adding ducts. A ductless install provides contemporary comfort with the original architecture and without the overhead of expensive duct building.
3. Altitude Impact
Elevation reduces air density and how heat transfers, so equipment frequently needs a bit more capacity than the same house at sea level. Mini splits with inverter compressors maintain cooling and heating output levels despite thinner air.
Pick cold-climate models and make sure your refrigerant levels are right. Calibration for elevation prevents inefficiency. Inverter systems minimize cycling losses and maintain temperature with less energy.
Installer experience with altitude-specific settings enhances long-term reliability.
4. Energy Goals
Ductless systems enable major energy savings through zoned conditioning and inverter efficiency, which slashes utility bills and greenhouse gas emissions. Intelligent controls run rooms only when occupied and set schedules based on your habits.
High-efficiency heat pumps are frequently eligible for state or utility incentives, supporting fuel-switching efforts. Ductless mini splits reduce gas consumption compared to furnace-based systems and pair nicely with solar panels or other renewables for more eco-friendly homes.
Installation Path
You can’t protect what you don’t know, so a clear installation path reduces risk, shortens timelines and protects warranties. This part dives into site evaluation, location decisions, permits, electrical and refrigerant hookups and testing. Every step presents choices that impact comfort, efficiency and ongoing service expenses.
Placement
Begin by taking an airflow audit of your home to determine room sizes and usage patterns and select indoor handler locations that provide balanced flow. Install units high on an interior wall, centered when you can, so it forces conditioned air across the room, not in corners where the circulation stagnates.
For bedrooms, install the unit so the air does not directly blow onto the bed but permeates throughout the room. The location of your compressor outdoors influences its performance and service accessibility. Select a shaded, well-ventilated location free of obstructions and debris, with 0.6 to 1.2 metres clearance on the sides and 1.8 metres above to allow for service access.
Don’t install in direct sun or near heavy pollen sources or snow drift areas. Raise the pad above areas where water or snow can collect.
Best practices list for placement by room size and layout:
-
Small Rooms
-
Place furniture against walls to maximize space.
-
Use multi-functional pieces to save room.
-
-
Medium Rooms
-
Arrange furniture to create conversation areas.
-
Ensure pathways are clear for easy movement.
-
-
Large Rooms
-
Divide the space into zones for different activities.
-
Use rugs to define areas within the room.
-
-
Open Layouts
-
Maintain a consistent style throughout the space.
-
Use furniture placement to guide traffic flow.
-
-
Small rooms (less than or equal to 15 square meters): one handler, centered on the longest wall.
-
Medium rooms (15 to 30 m²): consider two low-flow paths or a single higher-capacity head.
-
Open plans: Place heads to create crossflow and avoid dead zones.
DO NOT install indoor units close to heat sources like ovens, direct sunlight or laundry dryers. Limited air supply behind bookcases or in closets decreases efficiency and causes short cycling.
Permitting
Get permits before work begins to make sure it’s code compliant and you don’t have to do costly rework. Littleton, as well as many municipalities, require permits for new HVAC circuits and refrigerant handling.
Typical documentation required:
-
Permit application form
-
Site plan showing indoor and outdoor unit locations
-
Electrical load calculations and wiring diagram
-
Contractor license and proof of insurance
-
Manufacturer spec sheets and refrigerant type
Review HOA guidelines for outdoor unit aesthetics, setback, and noise restrictions. Working with licensed HVAC contractors makes permitting easy since they do all the paperwork, coordinate inspections, and ensure the installation fulfills manufacturer warranty requirements.
Connection
Refrigerant and electrical connections connect the indoor heads to the outdoor condenser. A 2.5 to 3 inch hole is bored through the outside wall to snake the bundled line set, which includes two copper refrigerant lines, a comm wire, and a condensate drain hose, through from the inside.
Properly flared copper lines are important because improperly flared lines will cause leaks and costly repairs. Install a dedicated circuit from the panel sized according to unit specs. This usually requires a licensed electrician and increases the cost.
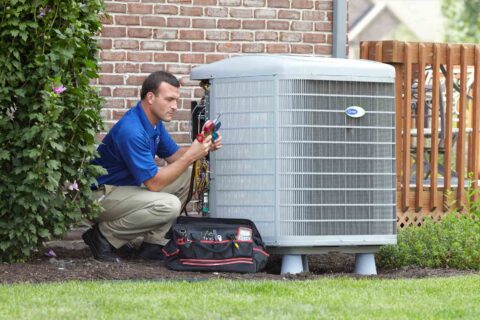
Leak check, vacuuming the lines to draw out moisture, and charging to the right refrigerant level come next. Test run, check indoor/outdoor comms, and drain and condensate traps. For a typical single-zone setup, an experienced crew finishes installation in 4 to 8 hours.
Cost Breakdown
Ductless mini-split installation costs by scope. A single-zone ductless mini-split system costs anywhere from 2,000 to 5,000 dollars for equipment and basic installation. Single-zone covers the area of one room or small office and typically comes with one indoor head, one outdoor unit, refrigerant lines, and standard wiring. Anticipate bottom-end numbers for easy installations with minimal line runs and no electrical enhancements.
The higher-end single-zone installations correspond to more efficient models, inverter technology, or extra features such as Wi-Fi control. Multi-zone systems range from approximately 3,200 to 14,500 and condition multiple rooms from a single outdoor compressor. Multi-zone pricing increases with the quantity of indoor units and system capacity.
Every indoor head adds equipment expense and additional labor for wall or ceiling mounts, piping, and control configuration. A 3 to 5 zone system for an average size home typically runs in the middle of that range. Large homes or small commercial spaces requiring six or more heads creep toward the upper end.
Labor and material line items count. Labor depends on the installer’s experience and local wage rates. Easy installs with accessible outside walls and short refrigerant lines are faster and less expensive. Complex installs with long line sets, multiple mounting locations or hard-to-reach outdoor unit locations require more time and more labor hours.
![]()
Typical auxiliary materials are mounting brackets, electrical disconnects, condensate solutions, and conduit. Other sitework can add predictable costs. Electrical upgrades typically range from 500 to 1,500 for small circuit work like a dedicated 240V breaker or new wiring to the unit. If the home requires a full electrical panel upgrade to support the load, anticipate an additional 3,100 to 5,200.
Wall snakes for recessing indoor heads or up-sizing conduits can set you back 200 to 600. These are typical when homeowners desire a purer aesthetic or when existing walls simply won’t take the lines. Energy savings and upfront costs should come into play. Ductless systems with inverter compressors and high seasonal energy efficiency ratings cut running costs compared to older central systems and leaky ducts.
Savings vary based on local electricity costs and usage. Over a few years, the lower operating cost can offset some of the initial premium, especially for targeted zoning. Seek out models with established seasonal performance numbers. Timing and incentives affect net cost. Off-season installs can be less expensive than peak summer months.
Check for local and federal incentives: tax credits, utility rebates, or efficiency program payments. Such as small credits for associated steps and incentives for eligible high-efficient units. Some auditors provide up to $150 towards home energy audits and other credits may be available. Check out Littleton’s rebates and add these to contractor quotes to paint a clear net cost picture.
Proper Sizing
About: Correct sizing Proper sizing is the process of pairing a ductless mini split’s cooling capacity to the true requirements of the room. Proper sizing has an impact on comfort, run time, humidity control, and energy consumption.
A unit that is too small won’t maintain temperatures and will run all the time. A unit that is too big short cycles, wastes energy, and can leave humidity elevated. Either result increases bills and decreases equipment life. Size should be based on square footage, insulation, ceiling height, window area, orientation, shading, and local elevation.
A crude initial estimate employs square feet. Multiple total square metres multiplied by 25 divided by 12,000 minus 0.5 equals tons. This is a rough tonnage and not a substitute for a professional load calculation.
Another quick guideline uses BTU per square metre: 20 to 35 BTU per square foot works as a baseline. These guidelines assist in selecting among models, but they overlook details such as insulation quality, sun exposure, or cathedral ceilings. Two same-size houses can require different amounts due to these factors.
Table: Recommended system capacities by room size and use
|
Room size (m²) |
Typical use |
Suggested capacity (BTU) |
|---|---|---|
|
up to 9 m² |
small bedroom/office |
6,000–8,000 |
|
9–14 m² |
standard bedroom |
8,000–12,000 |
|
14–23 m² |
living room/small open plan |
12,000–18,000 |
|
23–37 m² |
larger living/dining |
18,000–24,000 |
|
37–56 m² |
large open plan |
24,000–36,000 |
These ranges map to common ductless sizes: 18,000 BTU (1.5 ton) to 60,000 BTU (5 ton) with 6,000 BTU increments. Use the table as guidance, not gospel.
Get a Manual J or load calculation from a professional to determine specific requirements for each room or zone. A Manual J includes considerations such as local climate, elevation, insulation of walls and roof, type and orientation of windows, infiltration, occupancy, and heat gain from equipment.
If it’s multi-zone ductless, size each indoor head to its room’s load, not the whole house, and size the outdoor unit to accommodate the sum of connected indoor loads and diversity. For example, a sun-facing living room with high ceilings may need a 20 to 30 percent higher capacity than the same floor area on a shaded north side.
Sizing: When planning to install in Littleton or similar climates, account for elevation impacts on cooling capacity and confirm manufacturer performance curves for operating temperatures. Balance efficiency and run-time. Choose slightly higher sensible capacity for rooms with heavy solar gain and ensure controls allow individual zone setpoints.
Local Challenges
Littleton homes encounter a blend of climatic and site considerations that influence HVAC decisions and maintenance. Cold, snowy winters and dry, higher-elevation summers mix with diverse housing stock—bungalows, ranches, and newer builds—resulting in unique demands for comfort, efficiency, and system life span.
Altitude of about 1,615 meters (5,300 feet) reduces air density, so equipment can perform differently than at sea level. Installers must appropriately size systems and adjust refrigerant charge and airflow to local conditions. Arapahoe County and Littleton building codes and permit rules impact how work is done and inspected.
Identify common issues faced by Littleton homeowners
A note about local challenges: traditional ducted systems are prone to leaks and insufficient airflow resulting in uneven cooling in older Littleton homes. Leaky ducts allow conditioned air to escape into attics or crawl spaces, boosting energy consumption and reducing comfort.
Furnaces work harder in winter, which is cold and snowy, thus accelerating wear on heat exchangers, ignition systems, and distribution components. Almost every home has dry indoor air at altitude, so folks run things in inefficient ways to combat irritation.
Outdoor condensing units can get choked by leaves, snow, or debris. They require a minimum of 0.6 meters (2 feet) clearance to operate efficiently.
How ductless systems address these problems
Ductless mini splits eliminate ductwork as a failure point and provide conditioned air directly into rooms. That reduces energy waste due to leaky ducts and enables exact zone-specific temperature regulation.
For Littleton, that translates into more comfort in individual rooms without oversizing the whole-house system. Right equipment sizing and refrigerant charge compensate for reduced air density, and a properly tuned ductless unit will hit design temperatures more consistently than an ill-suited ducted system.
Outdoor units still require clearance and debris control. They bypass a lot of the distribution losses and cycling problems associated with long duct runs.
Maintenance needs and service advice specific to Littleton
Dust is a year-round concern, and any filters should definitely be cleaned or replaced once a month during heavy-use seasons to maintain steady airflow. Local challenges include dry summers and winter cycling, which require increased attention to check seals, outdoor unit clearance, and refrigerant levels.
At altitude, anticipate more performance checks to verify charge and compressor function. Have it serviced regularly, right before the busy seasons, and get it repaired quickly when it starts to lag — don’t let it wear out faster.
Make sure you do permits and inspections according to local codes, which is good for resale value and to keep everyone safe.
Conclusion
A ductless AC install Littleton works in a lot of Littleton homes. It chills rooms quickly, conserves energy, and eliminates clanky ducts from the equation. Local winters and hot summer days make a zoned setup handy. Choose a unit scaled to the room. Design wall or ceiling locations to maintain unobstructed and direct airflow. Anticipate installer time, a little bit of wall work, and a brief outdoor line run. Costs range by capacity and number of heads. Count on rebates and regular filter maintenance to maintain maximum output and minimum bills. To make it easy, grab a pair of quotes from licensed installers, compare local reviews, and inquire about warranties. Ready to shop or schedule a quote? Contact local professionals today.
Frequently Asked Questions
What is a ductless AC system?
Ductless AC, or a mini-split, combines an outdoor compressor with one or more indoor air-handling units. It cools or heats individual rooms without duct work. It is energy-efficient and provides flexible zoning for improved comfort and reduced energy costs.
How long does ductless AC installation in Littleton take?
The majority of single-zone installs are completed in two to four hours. Multi-zone systems typically take a day or two. Time depends on wall access, how many indoor units there are, and the complexity of the site. Licensed installers can give you specific schedules once they’ve had a chance to inspect the site.
How much does ductless AC installation cost in Littleton?
Pricing varies based on system size, zones, and installation difficulty. Expect a wide range. A single-zone system is generally lower cost. Multi-zone systems cost more. Get local quotes for precise pricing and potential incentives.
How do I know the right size ductless system for my space?
Proper sizing employs a heat-load calculation which takes into account room area, insulation, windows, and orientation. Oversized or undersized units lower comfort and efficiency. Have a trained HVAC technician do the calculation.
Are there local challenges specific to Littleton for ductless installs?
Altitude, seasonal temperature swings and local building codes count. Cold-climate-rated refrigerant and proper compressor placement assist performance. A local expert installer would handle these variables.
Do ductless systems save energy compared with central AC?
Yes. Ductless systems bypass duct losses and provide zoning control, reducing energy consumption when you only cool occupied rooms. Savings vary based on usage and SEER and HSPF ratings.
What maintenance does a ductless AC system need?
Clean or replace filters every 1 to 3 months. Get professional refrigerant, electrical, and airflow checks once a year. Routine attention maintains efficiency and prolongs system life.
Key Takeaways
HVAC maintenance saves Highlands Ranch homeowners from expensive emergency repairs and early system replacement by keeping…

Key Takeaways
Check typical locations to identify main and secondary water shutoff valves fast. These locations include basements, garages,…