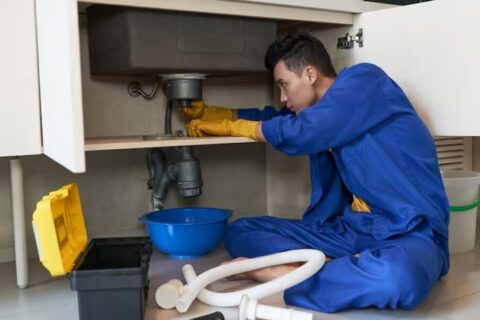
How to Fix a Toilet Leaking at the Base in Highlands Ranch, CO
A toilet leaking at its base means water is escaping the seal where the bowl meets the floor, usually from a failed wax ring, loose tee bolts, a cracked flange, or a shifting subfloor. In Highlands Ranch and across the south Denver metro, hard water and seasonal soil movement make these base leaks especially common, and catching one early keeps the damage to the seal instead of the subfloor.
Some base leaks are a quick, DIY-friendly wax ring swap; others hide a cracked flange, rotted subfloor, or a foundation-related shift that needs a licensed plumber. This guide covers the warning signs, the common causes, a step-by-step repair sequence, and realistic cost ranges so you can decide when to handle it yourself and when to call 1st Choice Pro Services.
Key Takeaways
-
Look for early warning puddles, floor discoloration, musty odors, and a toilet wobble to catch a base leak early and to help document timing and location for the service technicians.
-
Some of the most common causes of a leaking toilet at the base are a damaged or dried out wax ring, loose or broken tee bolts, a cracked toilet flange, or a cracked toilet itself.
-
Consider attempting a DIY repair if you have plumbing experience and the necessary tools, but hire a professional plumber for complex leaks or if you’re unsure. Always shut off the water supply and drain the tank before repairs.
-
Follow a clear repair sequence: prepare the area, remove the toilet carefully, inspect all components, then install quality replacement parts and test thoroughly to confirm the leak is fixed.
-
We take into account local Highlands Ranch variables like hard water, soil movement and altitude when choosing parts and repair techniques for long-term reliability.
-
Consider the relative costs of DIY versus professional help, factoring in parts, tools, time, warranties, and hidden costs such as water damage restoration when making your estimates.
Leak Signs
Leak signs, particularly around a toilet base, are usually subtle at first but can lead to waste and water loss as well as structural damage if left unaddressed. Early recognition minimizes repair scope, rising water bills, and concealed decay of flooring and subfloor structures. Below are obvious, actionable signs to keep an eye out for.
-
Water is present at or around the toilet base after a flush.
-
Damp or dark stains on flooring near the toilet.
-
Warped, buckled, or soft flooring adjacent to the bowl.
-
Persistent musty or sewage-like odors in the bathroom.
-
Rocking, shifting, or creaking toilets when used.
-
Recurrent puddles that do not evaporate quickly.
-
Mold or mildew growth concentrated near the toilet.
-
Intensified odors after flushing or when ventilation is poor.
-
Higher-than-normal water bills without other obvious uses.
-
A positive food-color test confirms tank water in the bowl without flushing.
Puddles
Notice water pooling at the base of the toilet after every flush, which typically indicates that the wax or new rubber seal has failed, the flange is cracked or the supply line connection leaks. Check for persistent wet spots that don’t evaporate, as this repeated moisture will nurture mold growth and degrade floor materials.
Blot ASAP with paper towels or a clean rag and again later. That simple action helps demonstrate if leaks are sporadic or consistent. Track where and when leaks appear. This includes immediately post-flush, only in long flushes, or after a toilet has been used by multiple individuals to provide concrete information to a plumber.
Floor Damage
Examine the floor for swelling, splitting, or peeling near the toilet due to extended water contact. Ceramic grout and vinyl seams will stain before plywood softens, so investigate margins carefully. Check for mold or mildew, frequently presenting itself as black or green spots beneath baseboards or along seams where water pools.
Check for spongy or soft patches by pressing down lightly with your foot. Soft spots are signs of subfloor rot and can require structural repair. Record alterations with pictures and dates to assist professionals in determining how to mend and to back up your insurance claim if applicable.
Odors
Know that lingering sewage or musty odors are leak signs, either a leaking toilet or a worn-out seal that’s releasing sewer gas. Shut the door and sniff around the base, behind the tank and adjacent fixtures to locate any drips.
Open the room to the outside and smell if odors increase after a flush, as both are signs of a pressure breach or failed trap seal. Add smell timing and intensity to service notes so techs know whether to prioritize leak detection methods such as dye tests or pressure checks.
Toilet Wobble
Test the toilet for movement by rocking the bowl gently. Instability usually indicates loose closet bolts, a failed wax ring, or broken flange due to soil movement or freezing and cracking. Listen for shifting noises when seated. Creaks can indicate concealed harm.
Mark the bowl location and recheck over days to ensure the toilet doesn’t migrate, which can cause broken seals and big leaks. If the wobble continues, schedule repair immediately. The longer you wait, the more water you’ll lose and the more damage to your floor.
Leak Causes
Toilet leaks at the base are born from a few mechanical failures, installation madness, and environmental causes. Determining the leak cause directs proper repair technique and eliminates repair redo or concealed water damage that increases monthly payments and damages flooring.
|
Common Cause |
Description |
|---|---|
|
Wax ring failure |
Wax seal degrades or shifts, allowing water to escape during flushes. |
|
Loose tee bolts |
Bolts corrode or loosen, breaking the seal and tilting the bowl. |
|
Cracked toilet base |
Hairline or large cracks in bowl or base cause constant leaks. |
|
Flange problems |
Broken, low, or misaligned flange prevents a proper seal to the drain. |
|
Condensation |
Moisture on tank or bowl mimics leaks; caused by humidity or cold water. |
|
Environmental factors |
Hard water, soil movement, roots, freezing, or high pressure stress parts. |
1. Wax Ring Failure
A faulty or misaligned wax ring permits water to leak between the toilet and the flange on each flush. Replacing the wax seal is the default fix, which involves removing the bowl, cleaning the flange, and putting in a new ring to create a watertight joint.
Old toilets are particularly prone to fail here because the ring compresses with age, and reseating over and over can warp it. Add wax ring checks to your routine maintenance to detect breakdown before floor damage begins.
2. Loose Tee Bolts
Loose or corroded tee bolts make the toilet wobble, breaking the seal at the base. Tightening bolts frequently cures minor leaks, but rusted or stripped bolts must be replaced in order to regain a secure connection to the flange.
Examine bolts for visible corrosion during routine maintenance visits and line them up correctly during new mounting. Correct alignment avoids uneven pressure that, over time, can cause seal failure or flange damage.
3. Cracked Toilet Base
Test the bowl and base for leaks and cracks that keep leaking. Small hairline cracks can widen and if a crack is wider than one-sixteenth of an inch, replace the toilet because repairs are iffy.
Do not use a cracked toilet to minimize water damage and structural risk. Opt for replacement bowls constructed of more durable components for lasting peace of mind.
4. Flange Problems
Flanges can crack, rust, or rest at an improper height, all of which cause leaks at the base. Fix or replace broken flanges and use the right tools to carefully adjust the toilet so that it seals accurately to the drain.
Check flange compatibility with the toilet model prior to repair. Soil movement, digging, or root intrusion can shift the flange position and intensify leaks.
5. Condensation Issues
Condensation develops on cold tanks in steamy bathrooms and puddles like a leak. Distinguish by inspecting the tank and bowl for drops.
Insulation kits minimize moisture accumulation. Fix any room humidity and ventilation issues to avoid repeating problems with actual leaks. Add condensation inspections to yearly service.
DIY vs. Professional
When your toilet leaks at the base, whether to DIY or hire a professional depends on scope, risk, tools, and your comfort level with getting your hands dirty. Here’s a straightforward checklist contrasting the two paths and what to expect in cost, time, and probable results.
The DIY Path
Gather necessary tools and materials before starting: adjustable wrench, putty knife, replacement wax ring or rubber seal, new closet bolts, rag, and bucket. Add a new flange repair kit if the flange appears to be worn. If your old toilet weighs around 90 lbs or more, consider having a helper or lift-assist ready.
A DIY replacement part costs anywhere from around $10 to $25, but cheap parts can give up sooner. Follow step-by-step guides for easy fixes. For the bolts, shut off the water, drain the tank, tighten evenly, and replace corroded washers.
For a wax ring change out, lift the toilet, check the flange, install the new ring, and reset the bowl straight down. Most home projects require sixty to ninety minutes when simple, but anticipate additional time if rust or skewing materializes.
Turn off the main valve and empty the toilet tank to avoid any surprises. Here’s a hint: keep the shutoff closed while you’re working and flush to clear water from the bowl. Sponge up the leftovers. Not doing this runs the risk of spills and concealed leaks when you put it back together.
Test the toilet after your DIY fixes. Search for water at the base during multiple flushes and seepage beneath the bowl. Check the subfloor for wet areas over the next few days. DIY has a medium to high error risk. If done wrong, it can result in subfloor rot, mold, and repair bills in excess of $3,500.
The Professional Path
Call seasoned Highlands Ranch plumbers for complicated fixes or stubborn leaks. Typical pro installation fees run between $100 and $300 and the plumber is usually there for one to two hours. Rates differ with components, trips, and regional market.
Ask for a deep-dive inspection because they may find something lurking in the background that you didn’t mention, like a broken flange, rusted bolts, or an uneven floor. Professionals have training to spot causes a homeowner might miss, which reduces repeat work.
Trust our professional plumbers for guaranteed craftsmanship and satisfaction. A licensed plumber’s work is incredibly low risk for anything going wrong and typically has a warranty, which gives you peace of mind and shields you from future expenses.
All this is great. If you want to skip the toilet issues altogether, schedule maintenance with a trusted plumber. Regular inspections identify wear early and prevent urgent calls and big fixes down the road.
The Repair Process
When repairing a base-leaking toilet, you need a definite step-by-step process from prep to final testing. Begin by verifying the leak’s origin, as base leakage can be confused with tank-to-bowl seal failures, hairline cracks in the bowl, or supply-line defects. A systematic repair strategy minimizes redundant effort and selects the optimal components to replace.
Preparation
Shut off the water at the shutoff valve and drain the tank by flushing and holding the handle down until the bowl and tank are at their lowest level.
Drop towels or plastic sheeting beneath and around the toilet to grab residual water and shield your floors from moisture and chemicals.
Lay out tools: adjustable wrench, screwdrivers, putty knife, gloves, sponge, and a new wax ring or compatible seal.
Manufacturer instructions for the particular toilet model typically include information about bolt torque and notes about seat removal. Many newer toilets use anti-siphon connections or nonstandard bolt sizes that can be damaged if overzealous.
Removal
Unhook the flexible supply line from the fill valve and set a small bucket under it to catch water in the line.
Take the caps off the closet bolts and unscrew the nuts, gently rocking the toilet to break the old seal before lifting.
Transport the bowl with caution; don’t drop or scratch the china on tile or wood. Inspect the old wax ring immediately.
A crushed or contaminated ring confirms a faulty seal, while dry or intact wax might suggest the leak came from elsewhere. Seal old parts and used rags in a bag for a clean work area.
Inspection
Check the flange for cracks, corrosion or an offset that keeps it from seating flush.
Examine the base and bottom of the tank for hairline cracks or drips at bolt holes and the tank-to-bowl gasket, as the floor wetness you see can at times be from a tank leak that is tracking down the bowl.
Check supply lines and shutoff valve for rust, kinks or seepage. Pay particular attention to the alignment of the flange to the floor, as a high or low flange can lead to seal failure down the road.
Record these results. It assists in determining if you need to swap out the flange, install a wax ring with a flange adapter, or take care of tank seals instead.
Installation
Set a fresh wax ring or compressed seal on the flange, or employ a wax-on-flange design when flange height is inconsistent.
Set the toilet down on the bolts and press down evenly. Then, alternately tighten nuts to avoid cracking.
Reconnect the supply line, carefully open the shutoff, and observe for weeps at the base and fittings.
Flush a few times and check over a few days. Some leaks only show up after pressure cycles or bedding settles.
If leakage returns, reset the toilet and re-seal. In stubborn cases, consider a thicker or double-wax solution.
Highlands Ranch Factors
Highlands Ranch factors that affect toilet leaks at the base and how to repair them. Local climate, standard construction and town water chemistry all impact how seals, flanges and supply lines hold up. Taking care of leaks means taking care of these regional details before you pick out materials or repair techniques.
Hard Water
Hard water leaves mineral deposits within our tanks, bowls, and supply lines that restrict flow and wear parts out sooner. Scale accumulates on fill valves and flappers, which can prevent a good seal and cause slow leaks at the base as leaks locate vulnerable points in the system.
Installing a water softener or even a point-of-use filtration unit decreases calcium and magnesium and may decrease the frequency of these failures. Regular descaling and inspection is helpful. Just one quick quarterly check of tank hardware, and cleaning with a mild acid solution where safe, reduces build up and prolongs part life.
If you’re replacing parts, opt for components and toilet models designed for hard water. For instance, vitreous china with smooth glazing and brass or stainless steel fittings resist pitting better than plated metals. Consider high-flow jets and rimless designs that keep passages clearer.
Soil Movement
Shifting or expansive soils can contort or heave floors and rearrange the positioning of a toilet on its flange. Slight movement can rupture that wax ring seal, resulting in leaks at the base which come back after repair if the source isn’t addressed.
Be on the lookout for wavy bathroom floors, new gaps appearing around baseboards, or repeated seal failures as indications of continued soil or foundation movement. Use flexible supply hoses and reinforced toilet flanges that allow small shifting without immediate seal failure.
A flange extender or a flange set in an epoxy bed will provide a more robust connection on older concrete or on floors that experience movement. If your symptoms indicate subsurface problems, work with a plumber who understands local soil types. They can recommend if slab stabilization, enhanced drainage, or alternative anchoring techniques are required to avoid subsequent leaks.
Altitude Effects
Highlands Ranch altitude has caused us to alter water pressure and flush tank volume dynamics, impacting toilet seals and flush force. Low ambient pressure may necessitate tuning fill valves to preserve appropriate tank level, preventing pressure tank cycling that wears out valves and seals.
Set fill and flush for the local altitude. Certain valve makers specify high-altitude environments or have kits that optimize elevation performance. Certain toilets with patterns optimized for low-pressure flushing, dual-flush and pressure-assisted ones frequently win out.
Make altitude checks part of planning new installs. Proper pressure balancing and correct part selection avoid premature deterioration and leaks at the base from subpar flush performance or overworked tank hardware.
Cost Considerations
A leaky toilet at the base can be anything from a simple seal replacement to repair work that reveals unseen water damage. Know what costs to expect, factors that influence price, and how to budget to determine DIY versus professional help.
DIY Expenses
-
Wax ring or seal kit: $5–$30.
-
New bolts and flange hardware: $10–$40.
-
Basic tools (wrench, putty knife, sponge) cost between $20 and $80 if not already owned.
-
Replacement toilet bowl (if needed): $70–$100 (parts only).
-
Flange replacement parts: $30–$120 if buying materials.
-
Misc consumables (silicone, caulk, gloves): $5–$20.
-
Possible tile repair materials depend on the area. Small patch kits are possible.
DIY can save labor. Labor is typically around 60% of a repair bill. Incomplete seals, misaligned flanges, or damaged bolts can cause recurring leaks. A basic wax ring swap can save $150 to $300 versus hiring a pro, but if you undervalue your time or make an error, repairs can skyrocket above $600.
Include the value of your time when weighing options. A few hours of work has real cost, and unexpected needs for additional parts or tools mid-project can add $50 to $200 more. If a leak is complicated, this short-term saving may vanish when you subsequently call a professional to repair the DIY blunder.
Professional Fees
Get written quotes from local Highlands Ranch plumbers to be sure. Repairs average $150 to $391. Small jobs can be $50 and complex jobs can go up to $600 or more. Labor and service fees are usually the bulk of the bill. Anticipate labor to be about 60 percent of the cost.
Replacing a toilet flange will typically cost $145 to $350 including labor. A new toilet is $175 to install and costs $90 to $1,500 for the fixture. After-hours emergency calls are $100 to $300 additional. Pros can factor in diagnostic inspection, travel, and parts into their quote. Warranties or satisfaction guarantees add long-term value by avoiding double charges.
Hidden Costs
Unnoticed or long-term leaks can push other expenses. Water damage restoration, mold remediation, or subfloor repair can be significant. Tile replacement during repair can add nine to twenty dollars per square foot. Subfloor replacement can be several hundred dollars.
Leaks increase water bills over time. If it costs more than half as much as a new toilet and installation, repairs often don’t make sense. Plan for regular inspections and maintenance to prevent urgent work and pricier fees down the line.
Conclusion
Toilet leaks at the base usually trace back to tight wax rings, cracked bowls, loose bolts, or shifting floors. Small leaks you can fix: swap the wax ring, tighten bolts, or reset the toilet. Bigger problems demand a plumber with local expertise. Highlands Ranch seasonal ground shifts and our hard water can accelerate wear. You can anticipate straightforward repairs to be cheaper and take an hour. Larger repairs may require materials and several visits.
Try a quick check first: floor dry spots, wobble, and smell. Keep tabs on repair costs and always obtain a minimum of two quotes for significant work. For persistent or complex base leaks, the licensed plumbers at 1st Choice Pro Services serve Highlands Ranch and the south Denver metro.
Frequently Asked Questions
What are the most common signs of a toilet leaking at the base?
Symptoms: Slow floor staining, water pooling after flushes, soft or warped flooring, and a rotten smell. You might notice continuous running or water on the bathroom floor surrounding the toilet.
Can I fix a base leak myself?
Yes, if it’s a wax ring gone bad and you don’t mind uninstalling and reinstalling a toilet. If the flange or floor is damaged, call a pro. DIY saves money, but it needs basic tools and care.
How long does a professional repair usually take?
Most base-leak repairs require one to three hours. A wax ring replacement is fast. Flange repair or floor replacement extends time. Pros can diagnose and repair the same day in many instances.
How much does it cost to repair a toilet leaking at the base in Highlands Ranch?
Plan on $80 to $400 for a basic wax ring replacement and $300 to $1,200 or more if your flange or floor requires repair. Local labor and material costs in your area impact prices. Obtain a written estimate from a licensed plumber.
Will a leaking toilet base cause structural damage?
Yes. Such continuous leakage can rot subflooring, damage finishes, and foster mold. Repair leaks immediately to prevent expensive structural damage and health hazards.
How can I check if the wax ring is the problem?
Check for water at the base after flushing and carefully rock the toilet to detect any movement. If water comes from the base and the toilet rocks, it is probably the wax ring or flange.
Do local conditions in Highlands Ranch affect repair choices?
Yes. Colorado’s seasonal temperature swings and house styles can impact flange status and materials used. Local plumbers know code requirements and the best materials for the region.
Key Takeaways
Be on the lookout for slow drains, foul odors, gurgling noises, water backups, and pest activity as indicators that drain…
Key Takeaways
Tankless water heaters provide instant hot water. They are energy and space-saving, and they usually have a longer lifespan…