How to Keep Your Pipes From Freezing This Winter
Key Takeaways
-
Locating and insulating pipes in susceptible areas like exterior walls, unheated basements and attics can minimize the chances of them freezing in winter.
-
Keeping your thermostat set no lower than 13°C and sealing air leaks around your doors, windows and where the pipes enter your home will protect your plumbing from the cold.
-
Letting your faucets drip, particularly in periods of severe cold, is one of the most important steps you can take to avoid frozen pipes.
-
Insulation materials such as foam sleeves, fiberglass wraps and heat tape offer extra safeguards for exposed pipes.
-
High-tech options, such as smart sensors and automatic water shutoff systems, provide additional protection and assist in early problem detection.
-
Properly dealing with frozen pipes through safe thawing methods and professional assistance when required can avoid expensive water damage and repairs.
To guard against freezing, they treat pipes with warmth and circulation. Winter weather can freeze pipes quickly and result in leaks or burst pipes.
Easy actions such as installing pipe wraps, dripping taps, and maintaining consistent indoor heat reduce the danger. When you know your weak spots — outdoor pipes or those in unheated rooms — it is easier to plan.
The next sections provide specific actions for winter pipe safety.
Understanding The Risk
Frozen pipes visit so many houses every winter. When water in pipes drops to 0°C (32°F) or colder, it can freeze and expand by as much as 10%. This expansion stresses pipes, causing them to crack or burst, particularly as ice obstructs water flow and increases pressure.
A burst pipe isn’t only a hassle; it can rack up over $10,000 in water damage repair. The majority of risks increase when temperatures fall below -6°C (20°F) or after an extended cold snap.
|
Area in Home |
Heat Retention |
Exposure to Cold |
Risk Level |
|---|---|---|---|
|
Outside Walls |
Low |
High |
High |
|
Crawl Spaces |
Low |
High |
High |
|
Under Sinks (exterior) |
Medium |
Medium |
Moderate |
|
Unheated Basements |
Low |
High |
High |
|
Attics |
Very Low |
High |
High |
|
Outdoor Faucets |
None |
Very High |
Very High |
|
Interior Heated Areas |
High |
Low |
Low |
The Science
It expands when it freezes. This transformation begins once water reaches 0°C (32°F) and can persist if it remains chilly. Pipes don’t just contain water; they contain pressure.
Just a thin layer of ice in a pipe can prevent water from flowing and where that pressure flows needs to be. If it can’t escape, pipes fracture or rupture. That risk increases during hard freezes or snowstorms when pipes can go from thawed to frozen in hours.
Maintaining a consistent indoor temperature really helps delay freeze up even when it’s chilly outside.
Vulnerable Areas
Pipes in crawl spaces or exterior walls freeze first. These areas are low in heat and frequently receive direct wind or cold through insulation leaks. Sinks next to exterior walls are dangerous, particularly if cabinets remain closed and prevent warmth from getting to pipes.
Basements and attics, unless heated, trap cold air and lay pipes bare. Outdoor faucets require extra attention. They freeze quickly and can crack without covers or insulation. Testing these spots pre-winter is crucial to preventing major leaks.
Climate Impact
Colder areas do experience more frozen pipes. There is no region that is safe. Sudden cold spells, even in moderate climates, take a lot of people by surprise.
When cold snaps persist for days, the risk of pipes freezing increases every hour. Climate change makes winter weather less predictable, so places with rare freezes like South Florida are now seeing more.
This change in implications means homeowners across the board should be vigilant for red flags and ready pipes as a routine chore.
Proactive Prevention
Winterizing pipes is more than just a seasonal duty. It’s an essential home maintenance practice! Frozen pipes can burst and result in costly repair bills and water damage. Act now before the chill settles in, and you’ll save time and money.
Here are steps to help keep pipes safe during the winter months:
-
Check, update, and insulate pipes and homes.
-
Seal wall, window and door gaps, holes, and drafts.
-
Be proactive. Maintain heat in every room with plumbing.
-
Let the water drip from pipes, particularly during frigid nights.
-
Drain and store outdoor hoses, winterize exterior faucets, and install covers.
1. Insulate Everything
While insulation is and should be a first line of defense, it doesn’t supersede full winter preparation. Go a step further and install foam pipe insulation sleeves on pipes in unheated areas like basements, crawl spaces, and garages.
Proactively prevent problems by insulating pipes in attics — particularly those adjacent to exterior walls — to protect them from chilly air. If you have outdoor faucets, insulated covers can protect your spigot as well as the short piece of pipe inside your wall.
For additional defense, you can slip insulated sleeves over your vulnerable outdoor pipes. Pipes in unheated spaces are most vulnerable as soon as temperatures drop below freezing. Prepping these pipes before winter reduces the risk of busted pipes and water leaks.
2. Seal Air Leaks
Any breeze near pipes can cause freezing, even a little one. Caulk or foam around pipes and especially any point where they enter from outside. Inspect windows, doors, and foundation joints for air leaks.
Seal holes in sill plates and around basement openings. Periodically run your hands along walls with plumbing to detect cold patches. A few minutes sealing leaks today can save you expensive repairs in the spring.
3. Maintain Heat
Leave thermostats set to no less than 13°C (55°F) even when you’re away. Leave cabinet doors open under sinks, particularly on outside walls, to let warm air circulate around the pipes.
For cold rooms, a portable space heater can ensure safe temperatures. Don’t ever turn off the heat in areas of the home with plumbing, even if you’re only leaving for a few days. Steady warmth is the foundation of frost-proof plumbing.
4. Allow Water Flow
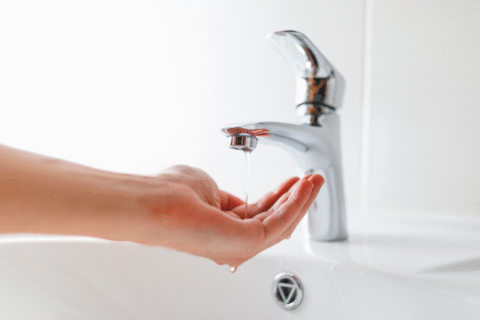
Allowing faucets to drip on cold nights keeps water in motion, reducing the risk of freezing. Turn on hot and cold taps so they are barely open to a steady trickle.
Use a timer if needed for flow during a deep freeze. Water in motion is more difficult to freeze, which makes this a simple yet very efficient measure. Even a small drip can be the difference between a safe winter and an expensive mess.
5. Disconnect Hoses
Take up garden hoses and store them indoors before the initial deep freeze. Drain and shut off outdoor valves. For older homes, consider installing frost-proof faucets to prevent water from remaining in the exposed pipes.
Use insulated covers on your outdoor spigots. If you fail to do this, come March, you’re faced with burst pipes and water leaks.
Insulation Materials
Insulation materials. It keeps water moving and prevents expensive plumbing repairs. Good insulation locks in pipe temperatures, even in the worst of conditions. This easily overlooked move can keep your pipes from bursting, potentially saving you thousands in repairs.
For optimal results, maintain a thermostat temperature of no less than 13°C (55°F) at all times, including nighttime. This can increase heating bills, but it reduces the chance of frozen pipes throughout the system. Here are some common materials that work well for pipe insulation:
-
Foam sleeves (flexible foam tubes)
-
Fiberglass wraps
-
Heat tape (electric heating cables)
-
Rubber insulation tubes
-
Polyethylene pipe insulation
Foam Sleeves
Foam sleeves are a quick solution to exposed pipes. They’re pliable and easy to cut and slip over pipes. The foam hugs the pipe, sealing out the frigid air. For optimal performance, ensure the sleeve is snug and free from any gaps.
This prevents cold spots and keeps water from freezing on the inside. Select foam sleeves of the appropriate thickness for your climate. Chilly spots might require additional layers of foam. In temperate climates, a thin sleeve is usually sufficient.
Inspect foam insulation annually for cracks, tears, or loose fit. Swap out tired pieces to maintain the system running smooth. Foam sleeves are cheap and easy to find at hardware stores. They are a great first line of defense in winter plumbing protection.
Fiberglass Wraps
Fiberglass wraps provide robust insulation where winters are harsh or pipes run through unheated spaces such as basements or garages. The wrap is spun glass fibers and is packaged in long rolls. Once wrapped, hold it in place with tape.
Wrap the entire pipe, ensuring you do not leave any exposed areas because they can allow drafts to enter and sabotage your efforts. As for risk pipes, supplement fiberglass wraps with foam sleeves or heat tape. This layering strategy pays off in extreme cold.
Inspect the wraps for moisture, mildew, or torn fibers, and change if necessary. Fiberglass is scratchy, so put on gloves and long sleeves while installing.
Heat Tape
Heat tape is an electric cable that runs directly on pipes. Apply it to frequently freezing pipes, like those running through outside walls or crawl spaces. Wrap the tape in a spiral or straight line, as the manufacturer recommends.
Plug it in only as needed and follow safe use instructions. Certain heat tape is self-regulating, allowing for energy savings and additional safety. Inspect heat tape annually for wear, fraying, or exposed wires.
If you see damage, swap out the tape to prevent a hazard. Ideally, you should put insulation over the heat tape to capture the warmth. This combination offers robust freeze protection, particularly in brutal climates.
Advanced Solutions
For those desiring beefier pipe freeze prevention, advanced solutions provide an extra level of protection. These tips go beyond the obvious and emphasize tech, planning, and preparedness. Consider these steps:
-
Install smart sensors to watch for low temperatures.
-
Schedule regular plumbing system audits before winter.
-
Equip your home with automatic water shutoff systems to prevent leaks and bursts.
-
Maintain your home thermostat above 13°C (55°F) at all times.
-
Label shutoff valves for easy access and check them regularly.
-
Report broken or missing meter lids to local authorities.
-
Coordinate with neighbors to spot bigger area-wide risks.
Smart Sensors
Intelligent sensors are able to monitor temperature at the point the pipes are most vulnerable, like in basements, attics and exterior walls. They trigger alerts to your phone or home hub if temperatures drop close to freezing, allowing you to respond quickly.
Most can be connected to home automation, so you can view readings live and receive alert notifications regardless of location. It is wise to test every sensor regularly to confirm operation and change batteries as recommended.
For instance, a sensor near a water meter in an unheated room can alert you before pipes freeze, which is crucial because one frozen pipe usually means more are right there, too.
System Audits
A full plumbing system audit goes a little deeper into checking your home’s pipes and fixtures. Best practice is having a licensed plumber to get this done before winter hits.
They seek out unprotected pipes, holes in insulation and areas where cold air intrudes. These audits should occur annually and results documented so you can schedule repairs or upgrades before cold weather sets in.
In case your plumber uncovers outdated pipes or fragile areas, remedy them immediately. Addressing this from the onset allows you to maintain the entire plumbing system neutral, not just one segment.
Even minor issues, if repaired early, prevent major ones down the road.
![]()
Water Shutoffs
Automatic shutoff valves detect pressure drops or leaks and terminate water service. This helps prevent catastrophic flooding should a pipe rupture.
Everyone in the household should be aware of the manual shutoff valve’s location and know how to operate it in case of emergencies. Identify the valve with neon tape or paint to make it easy to locate, even in the dark.
Make sure to test all shutoff valves a few times a year to verify that they function. Teach relatives this routine and conduct drills. This step can save time and reduce water damage when things do go awry.
Thawing Frozen Pipes
Frozen pipes can freeze up water and if carelessly handled, they can burst and cause water damage. FREEZING WEATHER THAWING FROZEN PIPES IMPORTANT THINGS TO KNOW, HOW TO SAFELY THAW AND REDUCE RISK. Be sure to inspect the rest of your property for additional frozen pipes, as one frozen section could indicate that the others are vulnerable.
Prior to thawing, shut off the main water source if you suspect a burst pipe and label the valve with bright tape or paint for easy access in dark conditions. Turn on the faucet attached to the frozen section. This eases pressure and lets water escape once it starts melting. If the pipe doesn’t burst, when thawing is done, turn the main valve back on slowly. Have one person check for leaks in the property while the other opens the valve, so you catch them early.
|
Thawing Method |
Effectiveness |
Safety |
Ease of Use |
Cost |
|---|---|---|---|---|
|
Blow dryer |
High |
Safe |
Easy |
Low |
|
Electric heating pad |
High |
Safe |
Easy |
Moderate |
|
Warm towels |
Moderate |
Safe |
Easy |
Low |
|
Heat lamp |
Moderate |
Safe |
Moderate |
Moderate |
|
Open flame (not recommended) |
High |
Unsafe |
Difficult |
Low |
Locate The Freeze
Look for indications such as frost, bulges, or wet areas on the pipe. These are obvious indicators of freezing at that spot. Begin at the faucet, which has no water flowing, and follow the pipe back to the colder sections of the building, including exterior walls, attic, and basement.
Use a thermometer to check pipe temperature at various locations. This will help you locate the freeze. Occasionally, interior pipes freeze if they travel through unheated spaces, so check both inside and outside lines. If your neighbors do as well, it could be something more extensive like a water outage.
Apply Gentle Heat
A blow dryer works well and is safe on most pipe materials. Concentrate the heat at the frozen location and proceed cautiously. Never use open flames or high heat. This can crack the pipe or ignite a fire. Warm towels or heating pads help, but keep that faucet open. Water has to go somewhere as it melts.
Thaw gradually to prevent a rapid burst of water, which may result in cracks and leaks. If you thaw one pipe, inspect the rest of the property for others. Maintain the room’s thermostat at or above 13°C, day and night, to deter any future freezes.
When To Call
Contact a licensed plumber if you can’t locate the freeze or if the pipe is behind a wall or ceiling. Reach out to a professional if you find leaks or the sound of running water when pipes are meant to be off.
If they’re freezing often, it could be an indication of larger issues, such as inadequate insulation or aging pipes. Routine maintenance can prevent future issues. Experienced plumbers have the tools and expertise to safely thaw pipes and can recommend upgrades to minimize future risk.
If in doubt, leave it to a pro to keep the property protected.
A Personal Viewpoint
There’s a scar from a winter with frozen pipes. When water froze one cold morning, I experienced how something so small can throw a whole day into slow motion and set the stage for larger issues. Pipes froze in the kitchen and bathroom simultaneously. It wasn’t even the mess or the stress; it was the price we paid afterwards.
Water damage from burst pipes is costly, and repairs can cost well above a higher heating bill. The clean-up, the lost time, the stress about mold or trashed floors—everything could have been prevented with a few easy precautions.
Prevention costs too, but it’s frequently a lot less than repairs. One important step is to maintain your home’s thermostat at the same temperature day and night. A lot of folks love to turn down the heat at night or during absences, but this allows pipes to become exposed to temperatures that cause freezing.
Turning the thermostat any higher than 13°C (roughly 55°) is a safe cold weather rule. It might translate to a heavy energy bill, but it’s a lot of money and hassle saved down the line. Warm air circulating the house prevents the pipes from freezing and keeps the plumbing functioning as it should. If one pipe freezes, it’s entirely possible that others will as well, increasing the danger.
It’s wise to inspect pipes regularly in the winter, particularly in areas that receive less heating, such as basements or beneath sinks. Insulating pipes, sealing holes, and ensuring warm air can access them does wonders. Pipes that freeze and thaw repeatedly are more prone to crack and split.
Getting these things handled before the coldest days arrive means less stress and more comfort. The price of water damage extends beyond the repairs. It encompasses missing items, the cleanup hours and even the occasion to vacate the premises while they fix it.
Easy things, like leaving cabinets open so warm air hits pipes or letting a little trickle of water run on really cold nights, are low cost ways to guard against big damage. These are not steps for those living in frigid locales, but for anyone who wants to dodge an expensive shock when the forecast changes.
Conclusion
To prevent frozen pipes, be proactive and start early. Wrap pipes with foam or resort to heat tape. Shut off outdoor taps and drain hoses. Drip taps in a cold snap. Use smart leak and heat-drop sensors. Inspect pipes regularly, find cracks or cold spots, and repair them quickly. Fast fixes are cheaper than repairs. Thousands of others across the globe follow the same steps. They work in city flats or big houses. We all get cold snaps, so easy, foolproof tricks go a long way. Spread the word — share these tips with friends or family. For additional advice or assistance, contact local professionals or consult reliable resources. Be safe and keep the water flowing.
Frequently Asked Questions
What causes pipes to freeze in winter?
Pipes freeze when the water within them dips below 0°C. Cold air, inadequate insulation, and infrequent use heighten the risk, particularly in unheated spaces.
How can I prevent my pipes from freezing?
Wrap any exposed pipes with insulation, maintain a consistent indoor temperature, and let your faucets drip a little. These steps keep water moving and warm.
What materials are best for pipe insulation?
Foam pipe sleeves, fiberglass wraps, and heat tape work well. Select materials rated for your specific local climate and pipe material for optimal results.
Are there advanced solutions for preventing frozen pipes?
Yes. Set up smart thermostats, heating cables on your pipes or automatic shut-off valves. These innovations provide additional security and comfort.
How do I safely thaw a frozen pipe?
Hair dryer or warm towels. Begin close to the source of water, the faucet, and work toward the frozen section. Never use open flames.
What should I do if a pipe bursts?
Shut off the main water supply immediately. For damage prevention, call your plumber!
Why is pipe insulation important?
Insulation traps heat, protects against freezing, and conserves energy. It is an economical way to safeguard your home and water system.

Key Takeaways
Recognize gurgling as the canary in the coal mine for trapped air, partial blockages, or venting problems and get them fixed…
Key Takeaways
Match your heater size to household needs by comparing tank capacity or tankless flow rate to simultaneous use and upgrade if…