How to Test and Maintain Your Sump Pump
Testing a sump pump takes about ten minutes: pour a few gallons of water into the pit, confirm the float switch rises and trips the pump, then watch the water drain fully and the motor shut off. For Parker and Castle Rock homes, run this check every three months and again before spring snowmelt, when Front Range basements face their heaviest water load.
A passing test does not guarantee a pump ready for every storm. Older units, stuck float switches, weak discharge flow, and dead backup batteries all signal trouble ahead. The guide below walks through each testing step and the warning signs that mean it is time to repair or replace before water reaches your finished floors.
Key Takeaways
-
Sump pumps are a foundation’s best friend, and regular testing and maintenance can be the difference between a dry basement and a flooded nightmare.
-
Knowing your sump pump basics will help you make the right choice.
-
Make sure to always take proper safety precautions, like unplugging power and wearing protective gear, before and during sump pump testing.
-
A step-by-step testing method, including visual checks, manual activation, and water tests, ensures reliable sump pump operation.
-
By knowing when it’s working normally and when it’s giving you a warning sign, you will be able to take quick action to deal with problems before they become expensive.
-
Record tests and maintenance to foster long-term reliability and track patterns.
Sump Pump Fundamentals
Sump pumps are mechanical devices designed to drain excess water from basements or crawl spaces, protecting living areas from flooding and moisture damage. Houses with crawlspaces or basements are most vulnerable to water accumulation, particularly in wet or rainy regions. When a sump pump does its job, it maintains your home’s foundation and reduces the chances of mold and water damage.
A good sump pump is a must for long-term security because a quality model can manage massive water flows and operate more dependably in that critical moment. A sump pump is generally comprised of a sump basin, pump motor, float switch, outlet pipe and occasionally a backup battery. The key varieties are submersible and pedestal, both with their own fit for different configurations and requirements.
Purpose
Sump pumps assist in pumping water from areas susceptible to pooling, such as basements or crawl spaces, prior to moisture permeating into floors or walls. This is particularly important in times of torrential rain or fast snowmelt when the water table can rise rapidly.
They prevent water from accumulating, which minimizes the danger of expensive repairs associated with damp carpet, trashed drywall, or compromised electrical systems. A functional sump pump prevents the foundation from cracking or shifting due to consistent water pressure or flooding.
In addition to preventing basement flooding, sump pumps keep the basement dry, which helps prevent mold and bacteria growth. This contributes to healthier air and a safer home for everyone that resides there.
Components
|
Component |
Function |
|---|---|
|
Sump Basin |
Holds incoming water and debris |
|
Pump Motor |
Moves water from the basin to an exit pipe |
|
Float Switch |
Activates pump when water reaches a set level |
|
Outlet Pipe |
Directs water safely outside the home |
|
Power Source |
Provides energy (main/battery) for pump |
The sump basin catches water draining in and occasionally small debris, containing it in one place for the pump to manage. The pump is turned on by a float switch, usually electromagnetic, that activates when there’s enough water to float it.
The vast majority of sump pumps have two cords: float and motor. The outlet pipe pushes the water out, away from the house, to prevent it from returning. Power is lifesaving. Without it, the pump will not function.
A reliable power source or robust battery backup is essential, particularly in storms when the power often goes out.
Types
|
Type |
Features |
Advantages |
Applications |
|---|---|---|---|
|
Submersible |
Fully sealed, sits in basin |
Quiet, space-saving |
Most home basements |
|
Pedestal |
Motor above basin, open design |
Easier to service, cheaper |
Small pits, tight areas |
Submersible pumps are ideal if you have a large or deep basin. They operate submersed and generally operate more quietly. Pedestal pumps, which have their motors mounted above the pit, are simpler to repair and can be less expensive, but they’re noisier.
Battery backup pumps kick in when the power goes out. They provide an extra level of protection, particularly if you reside in locations with common outages. For properties with special requirements, such as those where sewage or solid materials must be transported, ejector pumps or other specialty versions may be required.
It’s easy to test a sump pump. Just dump in about five gallons of water and see if it kicks on. Never let it run dry for more than a few seconds or you’ll damage it.
Testing every three months, and again before wet seasons, helps catch issues early and keeps your home protected.
Pre-Test Checklist
A sump pump test is best when you check off all the key steps before you begin. A little advance preparation can save you from dings, shorts and wasted work. Here’s a handy pre-test checklist focused on safety, tools and pit inspection – so homeowners and property managers can go into it with a little more assurance.
Safety First
Safety equipment counts. Gloves and safety glasses keep the grime, bacteria, and jagged edges at bay when you reach into the pit. Rubber-soled shoes help, particularly if the floor is wet or muddy.
Disconnect the sump pump before any inspection. Find the power and turn it off or unplug it. This minimizes the risk of electric shock.
Maintain clearance around the sump pit. Shift tools, cords, and other objects out of your path, so you don’t trip or fall while working. Be sure the floor is dry. Water and electricity don’t mix. If you encounter standing water, pause and dry before beginning. Don’t test in a flood or during a storm when the inside of the pit could be unsafe.
Essential Tools
-
Flashlight or headlamp for clear visibility in low light
-
Screwdriver for removing sump cover or debris
-
Garden hose for simulating water entry during the test
-
Multimeter for checking power supply and pump wiring
-
Work gloves and safety glasses for protection
-
Bucket for scooping out debris or excess water
A camera or phone is helpful for recording the pit condition in case repairs are needed down the road.
The garden hose comes in handy for the water test. Fill the pit and see how the pump reacts. You don’t need a multimeter for every test, but you should have one handy if the pump won’t start or seems to have electrical problems.
Optional items, such as a small brush or vacuum, can help you clean up faster. All of these are readily available around the house and at hardware stores.
Pit Inspection
Begin by peering into the sump pit. Unscrew the cover and flash a flashlight inside. Look for dirt, mud, small rocks, or leaves. Be careful with the inlet screen. It could be clogged and prevent water from entering the pump.
Check the float switch. Carefully shake it up and down to make sure it swings freely and isn’t snagging on wires or gummed by gunk. A stuck float will keep the pump from turning on.
Examine the pump cover for cracking or wear. Cracks can allow water into the pump housing, which will cause it to fail.
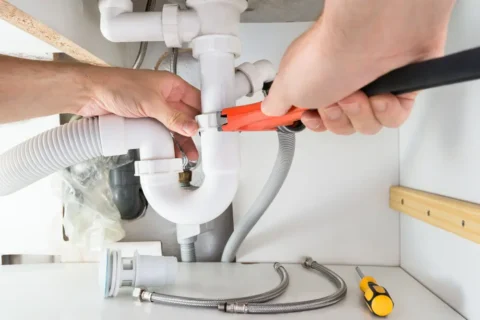
Dredge the pit if necessary. Dismount mud, rocks, or other debris with a bucket or scoop. If the pump is difficult to access or sealed, contact a professional. This way nothing blocks the pump operation when testing begins.
The Testing Method
Testing your sump pump saves you from water damage and keeps your equipment healthy. Checking the pump on a set schedule, in particular early spring and early fall, can catch issues before a deluge of rain or melting snow. Documenting every check and what you discover facilitates monitoring it over time and spotting early warning signs.
With a cautious, thorough, methodical approach, you can confirm your sump pump operates when you need it most.
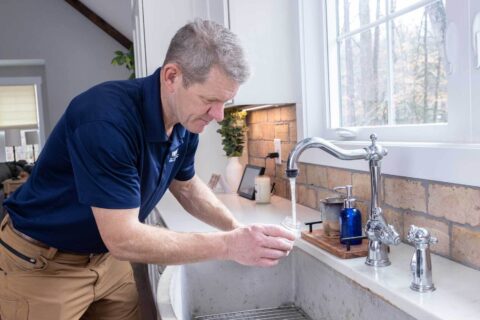
1. Visual Check
Begin by unplugging that sump pump for safety. See the pump and pit. Check for rust on the pump case, metal corrosion, or cracks in plastic. These symptoms tend to mean that the pump might soon die.
Verify the float switch. It should hang free and rise and fall without impediment. If your pump has two cords, one for the float and one for the pump, double check that both are plugged in correctly. A few lids are difficult to open, so you might require a float plug or small mirror to peer inside.
Check out that discharge pipe outside the house. Verify that the pipe directs away from the foundation and is not clogged with mud or ice. If water drips out where the pipe meets the pump, you might need to seal it.
2. Manual Activation
Plug it in and pump. If it has two cords, plug in the pump’s cord alone first to test if it runs. Then connect both cords. Pop the float or float plug if the lid is sealed. Your pump is supposed to start.
Try to hear any grinding, rattling, or strange sounds that could indicate worn components. Observe the float in motion. If it sticks, your pump might not fire when it’s needed.
![]()
Inspect the discharge pipe as the pump operates. The water ought to run with constant strength. If the flow is weak, the pipe is blocked or the impeller needs cleaning. Run the pump for just a few seconds so it’s not running dry.
3. Water Test
Dump bucketfuls of water in the pit. Introduce water gradually and observe the float’s ascent. The pump will activate prior to water reaching a critical level. Time how long it takes to empty the pit.
If the pump is slow, it is an indication that the motor is weak or the pipe is blocked. Test for leaks at the pit and pipe while the pump drains. If you observe drips, secure fittings or change seals.
Record how long the pump takes to clear the pit and any strange noises.
4. Backup System
If you have a battery backup, test it by unplugging the main pump or turning off power at the breaker. The backup should initiate automatically. If it does not, then inspect the battery wires and terminals for rust or grime.
Other systems beep or flash a light if the battery is low. Test the battery’s age and charge a minimum of twice a year. Switch it as necessary to prevent storm failure.
An insurance policy, such as a spare pump or portable generator, provides additional peace of mind for dual system failure.
Interpreting Test Signals
Decoding your sump pump’s messages during a test is the secret to maintaining a dry, beautiful basement or crawl space. Every stage of the test emits signals: normal, caution, and red alert. Understanding how to interpret these signs allows you to react quickly if there’s trouble and makes sure your pump is primed when it counts.
Normal Operation
A sump pump in proper operating condition will activate when the water in the pit accumulates to the height necessary to raise the float. When you turn on the system, the pump should run for a few seconds, making a consistent, low mechanical hum or soft whirr. Most homes have two cords in the outlet, one for the float switch and one for the pump.
During tests, unplug the float and plug in the pump directly to see if it powers up. Observe the water in the sump pit. The level will fall rapidly and evenly as the pump operates. If the water maintains or drains too sluggishly, you could have a clog or your pump is too small, particularly in homes with clay-heavy or compacted soil.
This type of dirt retains more water, thus requiring a more powerful pump more frequently. Routine tests, at least once every spring, catch problems ahead of the rainy season. Sump pump life expectancy is typically five to ten years, but a few premium pumps, if well maintained, can run for as many as twenty-five years.
Warning Signs
-
Loud knocking, rattling, or grinding noises
-
The pump runs but water doesn’t drain
-
The float switch gets stuck or doesn’t move
-
The pump continually runs, even if the pit is dry
-
Obvious leaks around the pit or discharge line
A float switch that sticks won’t do its job either because if the float can’t move, it can’t trigger the pump to turn on or off at the right time. It’s usually due to dirt or a misaligned switch. If the pump runs continuously, it might burn out or flood the pit.
This can occur if the switch becomes jammed in the “on” position or if the check valve malfunctions. Nonstop running is a pretty unambiguous indication that the system requires attention. Any warning sign should have you double-checking the fundamentals: power, cords, and float.
It’s easy to ignore early signs, and it can lead to bigger issues fast.
Immediate Failures
Instant fails are the sump pump not turning on, not removing water, or tripping the breaker. If the pump doesn’t start, check both cords and reset the outlet. If all else fails, seek help! Look for visible clogs or stuck components. A busted float or motor might be to blame.
Water not draining could indicate a clog in the discharge pipe or a failing pump. Electrical problems such as sparks, smoke, or frequent breaker tripping are hazardous and need immediate repair. Don’t ever disregard these signals!
When the pump won’t work after rudimentary checks or if it’s an electrical issue, it’s time to call a plumber. Having a backup like a battery powered pump can save you damage in case your main pump goes out.
Post-Test Actions
After testing a sump pump, these two steps protect your house and maintain the pump’s reliability. Knowing what to do post-test can keep small issues from growing. Good post-test follow-up extends the pump’s life and can help you identify issues before they cause water damage.
Below, we split these actions according to test results and practical advice.
Successful Test
A functioning sump pump reduces the likelihood of a flooded basement. If your test indicated that the pump fires up immediately, the float switch is free-floating, and water is ejecting, you can sleep easy before the next storm.
Note the test date on your calendar and plan to test the pump again in a few months, particularly before rain. Routine inspections ensure you detect issues such as a sluggish valve or blocked drain at an early stage.
Remember this victory. Record the date, how you tested (for example, poured 5 gallons of water into the pit), and what you observed. This is helpful if the pump struggles later.
Failed Test
If your sump pump shouldn’t engage, start by looking for the easy stuff. Check that the power cord is plugged in and the outlet works. If you have a double-cord pump, unplug the pump cord and instead plug the float cord right into the wall.
If the pump runs, your float switch is junk. Check for pit blockages, a stuck float, or a lid that won’t open. Sometimes the lid is sealed with old caulk and takes a little extra time to get off.
If you can’t find a quick fix, you probably need a new float switch or a new pump. Repairs can fix small problems, but if the pump is outdated or has already failed multiple times, replacement is safer.
For complex issues or if water is not draining outside the home, contact a sump pump professional. Backups like a battery-powered pump are smart if your primary unit dies.
Record Keeping
-
Maintain a logbook or computer file of every sump pump test.
-
Log the date, test method (slow pour, float switch check, etc.) and qualitative results.
-
Record any fixes or modifications, like ‘pit cleaned’ or ‘outlet pipe repaired’.
-
Go over past posts before each new test to identify patterns such as slow pump response times or float switch failures.
Monitoring the pump’s performance allows you to observe whether its power diminishes over time or whether the float becomes prone to getting stuck. Catching these patterns early can mean quicker repairs and fewer surprises.
Good records assist if you ever need to demonstrate proof of maintenance for home insurance claims.
The Reliability Mindset
A dependable sump pump begins with a simple maintenance mindset. To treat a sump pump as an integral element of homecare is to avoid responding to leaks or floods. Routine checks, performed in early spring and fall, prepare the system for intense rain or snow melt.
A simple test, dumping around five gallons of water into the tub, indicates whether the pump activates and drains appropriately. If the pump runs dry for too long, it wears down parts, so we only run it a couple seconds during tests. Noise, vibration, always running or a hot case are warnings. When these arise, a little inspection or a repair must be made to prevent more serious problems.
Proactive care is more than just testing. Rinse out the pump and pit every now and then to keep out junk that could clog the intake. Make sure the float turns freely and that the power source is strong.
The dirt around the house counts as well. Clay or packed soil causes more water to accumulate, requiring a more powerful pump. It matters to install correctly. A pump that’s set badly will fail more often, regardless of how often it’s inspected. It’s wise to have a pro install or inspect the pump if you’re uncertain.
It really matters to pick a nice pump. Some last as short as five years, while others with proper maintenance and care can last up to 25 years. Typically, anticipate roughly seven years of service, but maintenance may extend lifespan and mitigate hazard.
Investing a little extra with a reliable brand translates to less anxiety when the storms hit. Inexpensive pumps tend to have weaker components and don’t withstand intense use.
Maintaining a sump pump can save cash and headache down the road. Water damage is expensive, and a busted pump breaks a pinhole leak into a tsunami. A working sump pump translates to peace of mind, peace of mind that the home is protected.
Skipping checks and ignoring warning signs are gambles that rarely pay off. A little time now prevents the expensive repairs and cleanup later.
Conclusion
A functioning sump pump does a lot more than just keeping a basement dry. It delivers peace of mind amid storms and floods. Testing it is an easy task that provides unambiguous results. Little inspections and fast trials can prevent major water damage down the line. A sump pump that gets going on cue and shifts water immediately prevents damage and strain. Test it out before the rainy season hits and it will pay off. Broken pieces or strange sounds require a repair, not a speculation. Be safe and keep your home in shape by testing your pump regularly. For complex repairs or a full replacement, the licensed plumbers at 1st Choice Pro Services help homeowners across Parker and the south Denver metro keep basements dry through every season.
Frequently Asked Questions
What is the safest way to test a sump pump?
The surest way is to dump water into the sump pit until the float rises. The pump should activate and expel the water. Never put your hands near moving parts during the test.
How often should I test my sump pump?
Check your sump pump every three months. Testing prior to heavy rain or flood season is a good idea for peace of mind.
What should I do if my sump pump does not start during testing?
First, verify the power source and that the pump is plugged in. If it still doesn’t start, check for clogs or contact a professional for assistance.
How much water should I use to test a sump pump?
Dump around 5 gallons of water into the sump pit. This is typically sufficient to engage the float and initiate the pump.
Why is it important to test my sump pump regularly?
Testing your sump pump periodically guarantees that it functions as designed. This minimizes the danger of basement flooding and safeguards your home from water damage.
Can I test my sump pump without water?
There’s nothing better to test with than water. You can break the pump if you run it dry. Water lets you check both float and pump operation safely.
What are signs that my sump pump may need replacement?
If the pump sounds strange, runs constantly, or cannot evacuate water rapidly enough, it probably needs to be repaired or replaced.
Key Takeaways
Brown water typically results from rust, sediment, or minerals added by corroded pipes, disrupted mains, or alterations in…
Key Takeaways
Pinpoint the leak and joint type prior to selecting a repair method so you apply matching materials and tools.
Match…