
What is a backwater valve in plumbing and do I need one?
Key Takeaways
-
Backwater valve prevents sewage backflow into a home by letting it out as usual but automatically closes when there is reverse flow, safeguarding basements and ground floors from expensive damage.
-
Install the valve on the main sewer line close to where your home’s drain discharges and leave it accessible for maintenance to keep it operating properly.
-
Consider risk. Are you in a home with low elevation, any previous flooding, or a foundation drain connecting to sanitary? Has your municipality made them mandatory? Then you should install or retrofit a valve.
-
Get a professional plumber, adhere to national and local codes, dig and disrupt during installation, and record it for permits and insurance.
-
Protect your valve with yearly inspections, cleaning, and easy post-storm or plumbing tests to prevent failure and maintain your insurance coverage.
-
Compare the risks, costs, and effectiveness of each. Consult an expert in the field to determine which approach is best for your property.
A backwater valve plumbing system is a device that stops sewage from backing up into your home in the event of heavy storms or sewer back-up. It rests in the sewer line and allows waste to pass out while preventing backflow.
Backwater valves are often installed in basements or near main sewer exits and can be manual or automatic. Routine inspection and cleaning keep your valve reliable and minimize flooding risk.
Below, they break down different types, costs, and maintenance steps.
Backwater Valve Explained
Backwater valve is a plumbing device that prevents reverse flow of sewage into a home’s drainage system. It’s a one-way valve installed on the main sewer line that lets wastewater out of the house but shuts when flow attempts to come back in. That valve is backwater backflow or backwater valve backwater prevention, and it’s your frontline solution when the rain is pouring, the sewer is surging, or the sewers are blocked.
In several areas, plumbing code mandates a backwater valve where fixtures rest below street level and in places prone to flooding.
1. Core Function
Backwater valve is a valve that closes automatically and prevents sewage from re-entering your house during backflow. With regular use, the flap or gate inside the valve swings open and wastewater flows out without restriction. When city sewer pressure rises or flow reverses, that flap seals against the valve seat and prevents return flow.
This stops raw sewage, contaminants, and sewer gases from infiltrating living spaces, mitigating health hazards and costly cleanup and repair. For homes with basements or lower level fixtures, such a valve can sometimes be the difference between a minor drain issue and major structural and sanitation damage.
2. Key Components
Key components consist of the valve body, the moving flap or gate, floats in certain variants, and a service access cover. The flap or gate is the key moving component that prevents reverse flow and must seal tightly. There are valves that include floats that elevate with the backflow and assist in closing earlier.
An access cover, usually a 10 by 14 cm built-in hatch in the basement floor, but most references are in inches, permits inspection and cleaning. Some have a clear plastic cover so homeowners can visually confirm operation without opening it.
3. Triggering Event
Typical activation events include sudden, intense precipitation, sewer line obstruction, and city sewer surges. A sudden increase in city sewer line pressure forces sewage back toward the property and triggers the valve to close. Items like flushable wipes or grease that don’t belong there can clog lines and cause backflow incidents.
High groundwater and foundation drains tied to the sewer increase backup risk and underscore the importance of having a valve.
4. System Integration
You place the backwater valve in your primary sewer line leaving the house, near where drain piping exits at basement level. Match the fixture to the existing or follow the national plumbing code and local rules. If it is below street level, the NPC usually requires one.
Costs vary; it is about $500 during new construction but $2,000 to $5,000 to retrofit. It requires periodic upkeep if you want the valve to keep functioning for many years, and your insurance rates may benefit from its presence. Talk to your local licensed plumber about placement and installation.
Necessity Assessment
A backwater valve limits sewage from re-entering a building by allowing flow one way only. Assessing whether one is needed starts with an honest look at site conditions, building design, local rules, and future risk trends.
Risk Factors
-
Checklist for homeowners:
-
Basements or lower-level living spaces increase risk.
-
Ground floor, less than 30cm above street level, increases vulnerability.
-
Foundation drains tied to the municipal sewer establish direct reverse-flow pathways.
-
Properties in immediate proximity to creeks, lakes or low-lying storm channels exist in run-off pathways.
-
In-ground irrigation, pools or other cross connections generate contamination concerns and can frequently activate backflow-prevention requirements.
-
Most older neighborhoods have ageing sewer lines that clog or surcharge during heavy rain. More intense storms increase the possibility of backups. Quarterly checks for debris at accessible cleanouts and yearly tests for backflow preventers are wise. After a significant rainfall, an additional inspection or test supports your understanding that all is well.
Municipal Mandates
Several municipalities require backwater valves for new construction or major renovations. Pump permits almost always require inspection and documented testing. Local codes often require annual testing of backflow devices. Certain municipalities have rebates or cost-share programs for compliance, particularly in sewer hot-spot areas.
Homeowners must check city code sections pertaining to plumbing, seek permit advice, and arrange inspections prior to installation. Not obtaining required permits can result in your work being rejected upon sale or fines.
Plumbing inspections confirm valve type, access location, and that the device does not obstruct required service lines. For pool and irrigation homes, additional backflow preventers may be needed and must be annually tested to remain compliant.
Future-Proofing
Installing a backwater valve with new construction is generally cheaper and less disruptive than retrofitting. New construction often incorporates the valve into the main sewer branch below the slab or in a dedicated chamber.
For older homes in flood-prone zones, retrofits are worth looking into. Costs can be counterbalanced by reduced risk of widespread water damage and cleanup.
Strategy for shifting rainfalls and urbanization that increase runoff and sewer burdens. Put valve installation into a long-term maintenance plan, with quarterly debris checks and formal testing once a year.
Consider combining the valve with other measures: sump pumps, foundation drain routing, and landscape grading to keep flows away from the building. A backwater valve is an obvious mechanical line of defense but operates most effectively as one element in a layered strategy.
Installation Insights
A backwater valve stops sewage surges from the public sewer system flowing back into a property. Installation insights matter for long term performance, safety, and code compliance. We’ve got who should do it, what permits and standards apply, what you physically do, and how installation impacts your life.
Process
Find the main sewer line as it exits the building through plans or a licensed plumber’s video camera. This is then followed by excavation, which could be as minor as a trench or basement cut depending on the pipe depth.
Square cut the pipe, chamfer and deburr the ends, and then install the valve per manufacturer instructions. Most installs involve turning off the water and temporarily diverting waste lines, so expect this upheaval.
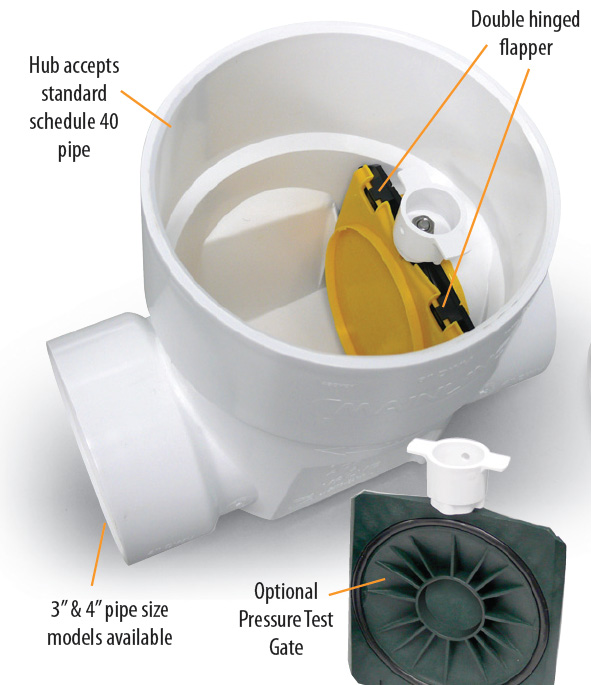
Once the valve is positioned, do cement or soil backfill and surface restoration. Homeowners should anticipate potential floor cutting or concrete removal in basements when the line is below slab.
Take photos and notes on every step, including pipe size, valve model, depth, and any alterations. This aids future inspection and servicing, such as the suggested quarterly inspection of the flapper for debris or blockage.
Location
Locate the backwater valve as near as possible to where the drain line leaves the house. The valve should be downstream of all basement plumbing fixtures so it blocks backflow to the lowest fittings first.
It is important to leave the valve somewhere accessible for regular inspections and flapper cleaning. This has to be done regularly or it will clog.
Do not site the valve upstream of foundation drains or sump pump discharges. Those systems ought to be outside the envelope of protection so as not to trap ground or sump effluent and place pressure against the valve.
Accessibility aids in quarterly inspections intended to verify the flapper is clear of debris and functions to prevent flow reversal.
Cost Factors
-
Labor and license costs for a licensed contractor or seasoned plumber.
-
Trench depth and difficulty of excavation, such as cutting concrete or slab.
-
Valve style and material, in addition to fittings, chamfering, and deburring materials.
-
Restoration costs for floors, landscaping, or driveways after backfill.
-
Extra fees for diverting waste lines or installing temporary bypasses.
Installation in finished basements or under concrete floors makes it much more expensive. Some municipalities subsidize or provide rebates for backwater valve installs – check yours!
Typical ranges vary widely by region and complexity, from low single-thousand figures for basic installs to thousands of dollars for deep, slab-level work. Installation insights, correctly installed and maintained, prevent backflow and decrease repair costs in the long run. Quarterly checks can spot issues early.
Maintenance Protocol
A backwater valve stops sewage from re-entering a structure. Good maintenance keeps the device reliable, extends its service life, and minimizes repair cost. Here’s a tight list of tasks and cadence.
-
Valve, chamber, and access lid should be visually inspected every three months.
-
Maintenance protocol – quarter-year check of flapper or gate for debris and free movement.
-
Twice yearly cleaning of valve chamber and parts, or as necessary.
-
Annual professional inspection and cleaning by a contractor (recommended).
-
Test operation after cleaning, major storms, or plumbing work.
-
Maintain a dated maintenance log with actions, observations and contractor reports.
-
Never try maintenance during heavy rain or during known sewer surcharging.
Inspection
Inspect the valve and access pit for debris, corrosion, cracks, or loose fittings. Inspect the flapper or gate for chips, warping, or material fatigue that would prevent a tight seal.
Test the flap to make sure it swings freely by giving it a light push. It should close easily and create an airtight seal without sticking. If the valve sits in a pit, gently turn the flapper access lid counterclockwise, approximately a quarter turn to loosen prior to opening to prevent sudden pressure release.
Check following significant rain events or suspected sewer surges as system surcharging can expose deterioration or permit debris admission. Have it professionally inspected once a year. Contractors can test door seals on the inside and swap out worn patches before they burn out.
Cleaning
Clear any grit, leaves, and solids away from the valve chamber and surroundings. Scoop or glove for solids and flush with water. Hot soapy water and soft brushes or cloths do wonders on the valve internals. Stay away from wire brushes that can scratch sealing surfaces.
Avoid harsh acids, caustics, or aggressive drain cleaners. These can corrode seals or pipes. Put the access cover back on and tighten once serviced, but don’t over-torque. Maintain the access pit. Keep it clear of standing water and secure the lid to prevent accidental entry.
Even if the homeowner cleans twice a year, I’d still recommend the annual contractor cleaning. While some assume backwater valves are “fit-and-forget,” regular maintenance like cleaning and inspection helps prevent stuck flappers and slow drainage problems.
Testing
Turn on several faucets to create a flow and observe the valve in action. The flapper should lift, then settle seamlessly. Be on the lookout for weird gurgling, vibration, or slow drainage that can indicate partial blockage or faulty seals.
Test after any cleaning or plumbing repairs to ensure proper operation. Log the date, tester, observed behavior, and any corrective action in the maintenance log. Fix leaks, slow response, or broken parts immediately before they cause an expensive backflow incident.
Beyond The Basics
A backwater valve is more than just a safeguard from having sewage come into your place. It saves you money on long-term repairs, diminishes health hazards from tainted water and ensures continued operation of ground level fixtures.
It assists in meeting code for new builds when fixtures sit below street level, and it can be equipped with inspection features that facilitate maintenance.
The Insurance Angle
A lot of insurers require a backwater valve or will discount if one exists. Insurers view valves as a risk-reduction effort, so having one can make a difference in your premium or deductible for water-backup claims.
Give the insurer proof of installation and any maintenance records. That documentation can open discounts or verify coverage for water backup. Remember that policies differ by company and jurisdiction, so review policy language and consult your broker post-installation to confirm coverage accounts for the new protection.
Costs matter: the valve device itself typically runs from about USD 250 to 500, not including labor. Putting one in during new construction might add around USD 500, but retrofitting an existing home costs USD 2,000 to USD 5,000.
These numbers influence the insurer’s perception of risk and the homeowner’s choice to invest.
The Peace of Mind Factor
It helps to know there’s a system when you’re knee deep in heavy rains and storms or municipal sewer overload. In homes with basements or where the first floor is less than a foot above street level, the probability of sewage backup is greater.
A valve eliminates that risk and the subsequent, messy, expensive cleanup. Visual inspection units with transparent flapper covers enable proprietors to inspect the flapper once per quarter for debris, so minor issues are identified before they’re an emergency.
Routine valve maintenance and accessibility are critical. A valve can fail when you need it most. Families and renters feel reassured knowing the device is there and maintained.
That feeling is practical: fewer interruptions to daily life, less chance of contamination-related illness, and a clearer plan for response if municipal sewer levels rise.
The Resale Value
A recorded backwater valve can make a home more marketable to buyers concerned about flood and sewer risk. Listing the valve in inspection reports and marketing material indicates active risk management.
Buyers love homes with what they consider to be less future repair costs, and maintenance records demonstrate the system has been serviced, increasing perceived value. If the property’s next upstream manhole is located higher than the first floor or lowest fixture, revealing the valve comforts purchasers that a known hazard was taken care of.
Comparative Solutions
Backwater valves prevent wastewater from backing up upstream because they allow one-way flow. This compares popular options, features, costs, and efficacy before assisting homeowners in selecting the appropriate unit or combination for their circumstances.
Standpipes
Standpipes are essentially vertical pipes inserted into floor drains to raise the overflow point of wastewater. These devices operate by raising minor backups so they don’t flood living areas. Standpipes are cost effective to install and easy to retrofit to existing drains.
However, standpipes provide minimal defense. They don’t seal against pressurized sewage and won’t stop a full sewer backup. A small kitchen drain might be acceptable with a standpipe, but a municipal sewer surge will blow right through it.
Standpipes fit low hazard or short term requirements. Deploy them where backups are scarce or in the meantime until a more heavy-duty patch. Pair standpipes with routine inspections because debris can lower their relative height and permit flow over.
Overhead Sewers
Overhead sewer systems divert wastewater above the basement floor level and then push it out to the exterior or a sewer line. They avoid basement flooding because gravity holds sewage out of below-grade rooms.
However, installation is intricate and expensive. Overhead sewer works best in new construction or large remodels where regrading floors, raising fixtures, and extensive plumbing work is already necessary. Pricing differs greatly by scale and geography and frequently goes significantly beyond bare valve costs.
In comparison to backwater valves, overhead sewers provide better basement protection and require significantly more upfront investment. Backwater valves are less expensive and less invasive, while overhead systems eliminate the low-elevation weakness completely.
Check Valves
Check valves can be opened in one direction and close when flow reverses. They are standard on sump pumps, irrigation systems, and certain fixtures. Plain check valves are inexpensive and easy to install.
Nonetheless, they don’t always seal as tightly as dedicated backwater valves. A check valve can fail to completely close under high-pressure backflow or with flotsam. Failures occur more often in sewer surges than small reverse flows.
Check valves serve as a backup. Couple them with a backwater valve or sump pump for defense in depth. Regular inspection matters: experts suggest checking mechanisms quarterly and clearing debris. Before testing any valve, run hot soapy water down a sink to flush out the pipes, increasing the accuracy of the test.
|
Option |
Typical cost (device) |
Effectiveness |
Notes |
|---|---|---|---|
|
Standpipe |
Low |
Low for major backups |
Cheap, temporary, limited sealing |
|
Overhead sewer |
High |
Very high (basements) |
Best for new builds, major work |
|
Check valve |
Low–moderate |
Moderate |
Good as supplement, may leak under pressure |
|
Backwater valve |
$250–$500 install; retrofit $2,000–$5,000 |
High |
Designed for sewer backflow; needs maintenance |
Local codes might mandate backwater valves in some locations, and insurance might as well. Backwater valves complement sump pumps and other steps for comprehensive protection.
Conclusion
A backwater valve eliminates the possibility of sewage flow into a structure. It attaches to the waste line and shuts when sewer pressure increases. Those in low lying areas or shared lines, homeowners and buildings, get defined, quantifiable protection. A correct install by a licensed plumber reduces flood risk and can satisfy local codes. Periodic inspection and basic cleaning maintain the valve’s dependability. For certain locations, a backflow mat or a pump provides additional protection. Select according to pipe configuration, flood experience, and budget. Local and insurance rules often matter. Next steps are to ask a plumber for a site check and a written quote, or get one or two more bids to compare options and costs before you decide.
Frequently Asked Questions
What is a backwater valve?
A backwater valve is a plumbing device that stops sewage from flowing back into a building during sewer backups. It allows waste water to exit but shuts to prevent backflow, safeguarding basements and lower floors from pollution and harm.
Do I need a backwater valve for my home?
You need one if your sewer line sits below your home’s plumbing fixtures or you are prone to frequent sewer backups or heavy storms. A licensed plumber can check flood risk and local codes to validate need.
Where is a backwater valve installed?
It’s placed in the building sewer line, typically in the basement or crawl space prior to the sewer leaving the premises. The location has to permit access for inspection, maintenance, and code compliance.
How often should a backwater valve be inspected or cleaned?
Check every 6 to 12 months and after heavy storms. Clear out debris, test the flap or gate, and check all seals. Routine inspections minimize the chance of malfunction and expensive flood damage.
Can I install a backwater valve myself?
No. Installation demands plumbing and sewer expertise, permits, and frequently excavation. Employ a professional plumber to make sure it is properly located, trap angles are adjusted, and local codes are observed.
What are signs a backwater valve is failing?
Signs include slow drains, foul odors, abnormal gurgling, or damage observed during inspection. If the valve fails to close or is stuck open, it won’t prevent backup, so it requires repair or replacement.
Are there alternatives to backwater valves?
Yes. Other options are sewer line backflow preventers, sump pumps with alarms, and municipal upgrades. Each is appropriate to different risks. Have a plumber look at the situation to compare efficacy, cost, and code issues.

Key Takeaways
Isolate the smell by determining its precise odor, where it is coming from and when it occurs, in order to zero in on causes…

Key Takeaways
Check the float and pit for obstructions, wear, or switch faults. Clear debris or entangled cords to allow free float…