
How to Replace a Toilet Fill Valve
Key Takeaways
-
Know your parts! Identify the fill valve, flush valve, overflow tube, and refill tube before you get started so you can match and replace parts correctly and avoid compatibility problems.
-
Collect tools, turn off the water, and empty the tank completely to minimize spills and ensure the removal and installation process is safer.
-
Take out the old valve by disconnecting the supply line and unscrewing the lock nut. Then fit the new valve with the rubber washer inside the tank and adjust the height to the suggested water level.
-
Reconnect the supply line, open the shut-off valve slowly, then test for leaks, proper height, and refill of the bowl through the overflow tube.
-
Troubleshoot common valve problems such as constant running, slow fill, or noises by checking refill tube placement, cleaning inlet screens, adjusting float height, and tightening connections without overtightening.
-
Your new valve needs some care, too. Regular inspections, cleaning to prevent mineral buildup, and replacing worn parts at the right times will keep it saving water and performing well for a long time.
How to replace a toilet fill valve shows you how to change the component that regulates water flow into the tank. A new fill valve can quiet annoying noise, prevent slow fills, and minimize water waste by sealing well.
Common tools are an adjustable wrench, a sponge, and a replacement valve for your toilet. The how-to below outlines simple steps, time estimates, and typical problems to foresee on the task.
Toilet Anatomy
A toilet has a couple of critical components designed to circulate water in a convenient and hygienic way. The tank stores water until flushed and the bowl accepts waste and deposits it into the drain. The fill valve draws water in from the supply line. The flush valve, which can be a flapper or canister, releases that stored water into the bowl. The overflow tube stops tank overfill.
Knowing where each piece sits and how it connects to the others makes swapping out a fill valve simple and minimizes errors.
The Fill Valve’s Role
The fill valve opens once more after a flush, allowing water from the supply line to enter the tank until the predetermined water level is achieved. Toilet anatomy detects the level by a float or internal mechanism that closes the inlet when pressure or height reaches the set point.
The valve has to cease water exactly to prevent slow overflows or too-low levels that compromise the flush. The refill tube runs from the fill valve to the flush valve overflow tube and shoots a small stream of water into the bowl after the main flush.
That bowl refill is key; otherwise the trap will siphon dry or the subsequent flush may be feeble. The correct routing and clips make sure that it doesn’t spill water into the tank or run constantly.
A well set fill valve favors water saving. New valves meter flow and limit refill volume so less water is wasted without sacrificing performance. Little tweaks to the valve height or float position can save liters per flush, which is valuable for houses and buildings looking to trim their utilities bill.
Failure Signs
A telltale symptom of impending doom is water running into the bowl or tank when you release the handle. This can indicate the valve isn’t closing clean or the refill tube is out of place. Slow leaks into the bowl or dripping at the base of the valve indicate worn seals or cracked parts.
Exposed corrosion, hard-water mineral deposits or faded plastic components indicate wear and increased potential for unexpected breakage. These deposits can keep valves from seating and cause erratic operation.
If the water level changes between flushes or the tank takes forever to refill, your valve is probably due for some service or a replacement. Listen for unusual noises: hissing, whistling, or long fill cycles indicate flow restrictions or partial closures. Record meter readings whenever feasible to verify non-evident leaks.
Valve Types
|
Type |
Features |
Pros |
Cons |
|---|---|---|---|
|
Float-cup (modern) |
Adjustable height, quieter |
Precise level, easy fit |
May be pricier |
|
Ballcock (older) |
Large float arm |
Simple, easy parts |
Bulky, less precise |
|
Fluidmaster-style |
Compact, plastic seals |
Affordable, common |
Some models less durable |
|
Specialty (e.g., Korky) |
Brand-specific upgrades |
Durable, quiet |
Cost higher, check fit |
Compatibility varies by tank height, mount style (bottom or side), and supply connection. Universal valves fit most tanks, and you should verify inside depth in millimeters. Specialty valves provide durability or reduce noise, but you should check compatibility.
Essential Preparation
About the only way to avoid these problems is to collect the right parts and tools in advance. Generally, a fill valve will last approximately 5 to 7 years, so don’t be surprised if you need to replace it if the whole unit is older or inefficient with water usage.
Personal preparation: you want to know your toilet model, tank height and hole size. Measuring the toilet tank from bottom to overflow tube will help determine parts, as well as the diameter of the mounting hole.
Have a bucket on hand to catch tank water and surround the base with towels to safeguard floors and soak up drips. Empty the vicinity of the toilet so you can easily maneuver and kneel without falling over objects. This also prevents small pieces from disappearing.
Required Tools
-
Adjustable wrench (10–22 mm)
-
Channel-lock pliers
-
Flat-head and Phillips screwdrivers
-
Utility knife or putty knife
-
Tape measure and marker
-
Bucket or shallow container for water
-
Towels or absorbent cloths
-
Safety gloves (recommended)
-
Flashlight for tank visibility
-
Small container for screws and nuts (optional)
-
Silicone grease or plumber’s tape (optional)
On the optional stuff, like a bag or container to hold nuts and screws so you don’t lose them. Gloves keep your hands clean and enhance your grip when you’re loosening rusted-on fittings.
A flashlight comes in handy if the tank is dark inside or you need to peep into the overflow tube region.
Choosing a Valve
There are fill valves designed to fit specific toilet brands, so try to match the new valve to the toilet’s tank height and the diameter of the mounting hole when possible.
Try to choose a valve that has an adjustable refill or float setting so you can fine-tune the water level and save more water. Some valves provide a refill tube clip for dependable refilling.
Consider materials: plastic valves resist corrosion and typically last 5 to 7 years in average water, while brass components last longer but cost more. Verify that the valve contains all the required hardware—mounting nuts, washers, clips, etc. Is compatible with your toilet.
Water Shut-Off
Identify the shut-off valve close to the toilet base or along the supply line, which can be a wheel-style or quarter-turn valve. Turn the shut-off valve clockwise until it stops to shut water flow.
On older valves, use steady, even pressure to prevent breakage. Flush again to drain the tank and test for complete shut-off. Try another flush; no refill means success.
Lay a towel and bucket under the supply line before you disconnect it to capture leftover water and toss any removed water in there. Disconnecting the supply line from the fill valve is a deal breaker. Do it after testing the shut-off for a spill!
The Replacement Process
Shut off the water at the shut-off valve before you begin. This keeps the floor from getting soaked and possibly wrecking your sub-floor. Fill valves typically last 5 to 7 years depending on water quality. Valve replacement requires simple tools and a little mechanical attention.
Proceed with straightforward, incremental operations and treat components delicately, particularly the old valve, to sidestep shards or remnants that might be the culprit for subsequent leaks.
1. Drain the Tank
Flush the toilet to push most of the water out of the tank. Sponge or towel out any water left in the bottom. Leave the tank as dry as possible to minimize slipping and mess.
Take off the tank lid and set it somewhere it can’t fall or shatter. Assure the tank is completely drained prior to continuing. Water left in the tank can spill when you remove the valve and complicate the job.
2. Remove the Old Valve
Then, using an adjustable wrench, disconnect the water supply line from the bottom of the tank. Turn the wrench slowly and if necessary, hold the valve from above to prevent twisting the tank.
Unscrew the lock nut under the tank that holds the fill valve. Be careful not to overtighten or twist the tank wall because porcelain can crack.
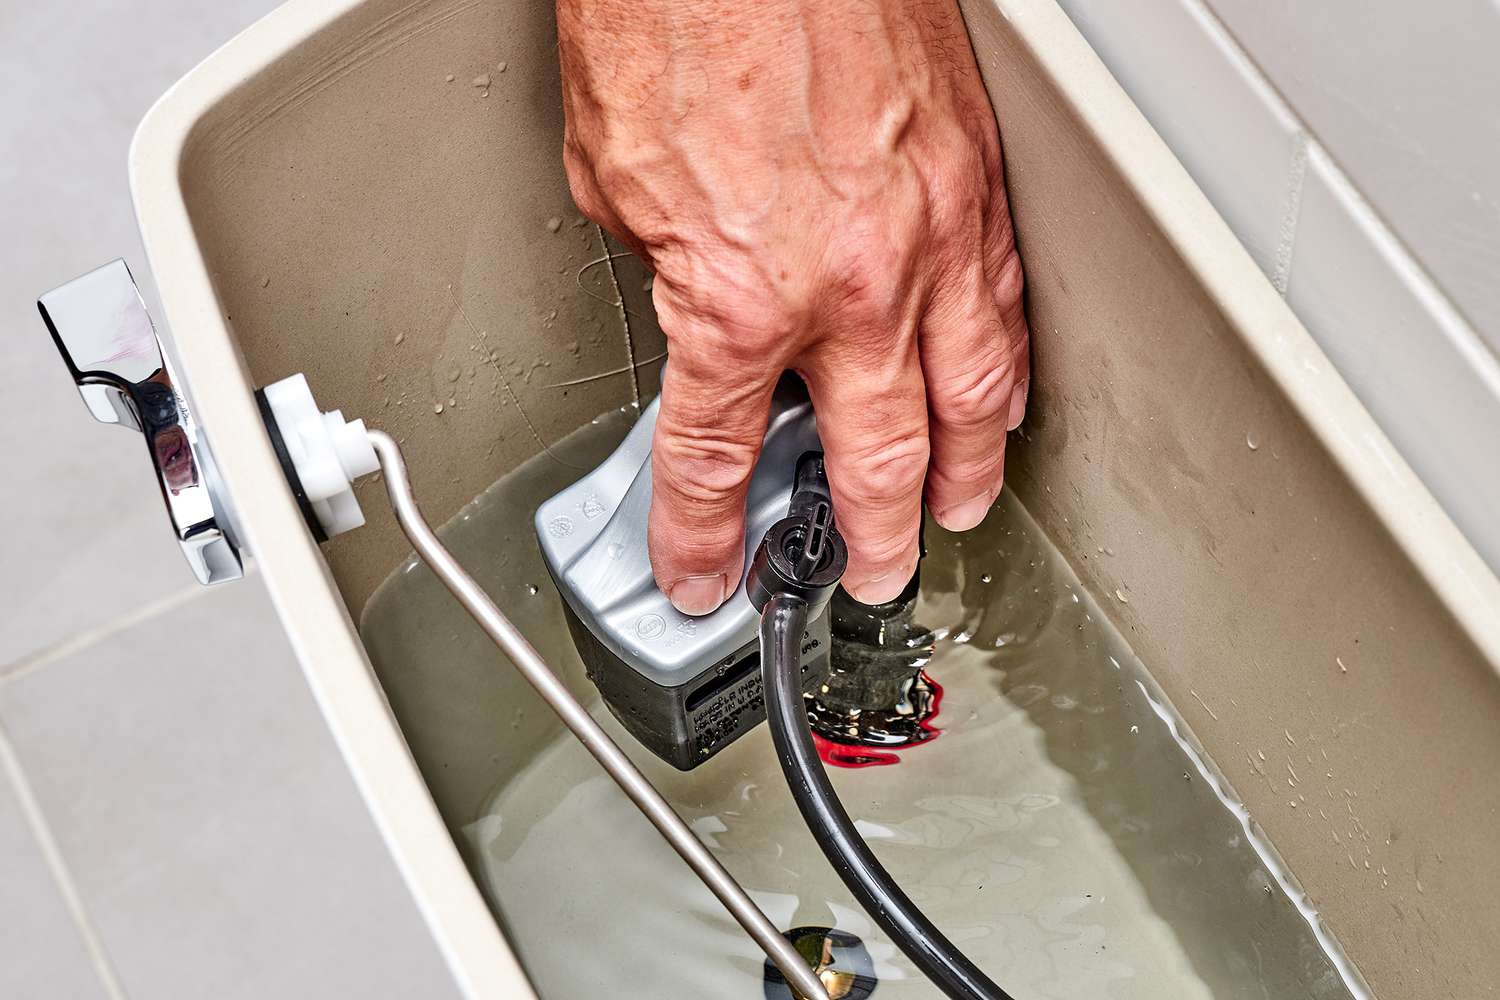
Pop the old fill valve straight up and out. If the base is frozen in place, twist gently while pulling upward to release it. Take any refill tube or metal clip out of the overflow tube and leave worn rubber washers out to die in peace.
3. Install the New Valve
Drop the new fill valve in through the tank hole with that rubber washer on the inside of the tank. Then position the new valve at the appropriate height so the top is in line with the water level mark.
It is very important to get this right for proper fill and overflow shutoff. Tighten the valve from underneath with the accompanying nut, first by hand and then gently with a wrench.
Don’t overtighten; snug is fine. Connect the refill tube to the overflow tube with the clip. Replace the float or refill tube if necessary to make them compatible.
4. Reconnect Water
Reattach the water supply line to the bottom of the new valve and tighten, but not too much. Double-check fit and alignment of all connections before turning water back on.
Turn the shut-off valve open slowly and allow the tank to fill. Check for leaks at every connection and listen for running water that suggests an incorrect seal.
5. Test and Adjust
Watch the tank fill, and make sure the water stops at the right height. Adjust the valve if necessary.
About the refill tube, make sure the refill tube is directing water into the overflow tube, not down into the bowl. Flush a few times to ensure smooth operation and no leaks.
Post-Installation Checks
Once you’ve installed the new fill valve, check the tank and valve assembly to make sure they operate properly and don’t leak or flush poorly. Begin with a visual sweep of the interior of the tank, the base of the valve, the supply line connection, and the overflow tube. Verify moving parts are free and that no debris or installation shims remain inside.
Make a note of the install date now for later servicing and warranty requests.
Water Level
Verify water level matches the manufacturer’s mark on the fill valve or is approximately 25 mm below the overflow tube top. If it sits higher than that, it is at risk of running into the overflow and wasting water. If it is lower, flush power and refill timing suffers.
Turn the fill valve height or the refill adjustment screw in small increments and let the tank fill completely between adjustments to catch the true effect. Ensure the refill tube clips to the overflow tube and that its open end is above the waterline. The refill tube cannot be submerged because that can allow backflow into the supply.
If the level continues to drift after multiple adjustments, mark this and consider additional float seal checks or an alternate valve style.
Leak Inspection
Check around the base of the fill valve, the nut under the tank, and the supply line coupling for drips, dampness or mineral accumulation. Use a dry paper towel to wipe joints, then check again after a few minutes for slow seepage. If you notice leaks, snug the fittings a quarter turn at a time, stopping once they are stopped short of overtightening, which can crack plastic or crush washers.
For slow, hard-to-find leaks, place a sheet of plain paper beneath connections and look for dark spots after 10 to 15 minutes. Leaks that persist after careful tightening are signs of a damaged washer, misaligned seal, or a cracked tank fitting. Fix these promptly, or you’ll have water damage.
Flush Performance
Flush a few times to test strength and completeness. The bowl should flush waste in one flush and refill at an even, consistent rate. Check the flush jet and siphon action. Weak, partial flushes usually indicate that the water level is too low or the refill tube is routed improperly.
Hearing high-pitched or chattering sounds during fill indicates valve vibration or pressure problems and you may need to replace the valve or add a pressure-limiting washer. If flushes are slow, back off the water level a bit or open the valve flow adjustment and retest.
Document any abnormal observations and the installation date for the service record.
Troubleshooting New Valves
Troubleshooting starts with a quick scan of potential culprits and a rapid check protocol. Once you’ve installed a new fill valve, keep an eye on the tank and observe for any strange behavior during the initial 48 to 72 hours. Little tweaking usually solves these problems, and if it doesn’t, that means you’ve got debris, misalignment, or a bad part.
Constant Running
Fill Check where the refill tube enters the overflow tube. If you push it too far down, water runs right into the bowl and holds the valve open. Pull the refill tube back so it lays just above the overflow tube lip.
Check the fill valve seat and valve for grit or small pieces. Gunk can get in the way of the valve seal closing. Turn off water, take off the valve cap if you’re designed that way, then flush out the internals or brush them with a soft brush to remove particles. Re-seat carefully so as not to cross-thread.
Fix the float or refill setting to stop the water at the right level, typically around 6 to 13 mm below the overflow tube top. For float cup valves, slide the clip. For float ball types, bend the arm a bit. Random House, Small moves matter, 2.
Examine the flapper or flush valve seal. A leaky flapper can mislead a fill-valve fault by leaking water and causing constant refilling. Scour the flapper seating surface and replace it if warped or hardened.
Actionable quick fixes:
-
Move refill tube slightly upward if inserted too far.
-
Flush the fill valve internals under low-pressure water.
-
Raise the float incrementally to shorten fill time.
-
Swap out the old flapper for a new rubber one if it is sealing poorly.
-
Retighten locknut under tank.
Slow Fill
Double check the shut-off (angle) valve feeding the toilet is open. A half or part open restricts flow and causes slow refill. Rotate it anti-clockwise until it jams.
Take out and clean the fill valve inlet screen for sediment. Mineral deposits can clog the flow, particularly in hard water regions. Scrub with vinegar or a soft brush, rinse well, and reassemble.
Raise the fill valve or float so it takes in more water before shutting off. For adjustable-height valves, crank them up to the manufacturer’s suggested height so the valve opens with full head pressure.
If slow filling persists despite cleaning and proper adjustment, the fill valve may have internal degradation or a manufacturing defect. Troubleshoot new valves by replacing the unit with a higher-flow model if local water pressure is low.
Unusual Noises
Hear right after a refill cycle for hissing, banging, or whistling. Hissing commonly indicates a partially closed supply valve or a thin crack in the fill valve body. Turn or swap as required.
Check and tighten any loose fittings under the tank. Solve New Valve Troubleshooting by repositioning the refill tube so it is not vibrating against the overflow or tank wall. A tube rubbing during flow can whistle.
Open the fill valve knob or twist the cap counterclockwise if so designed to flush trapped air or debris. Then do a fill cycle. If banging is persistent, it may need an anti-siphon or arrestor device on the supply line.
If noise indicates internal defects, swap out the fill valve for a quiet design model and check fitment with your tank.
Optimizing Performance
We optimize the fill valve for reliable flushes, less wasted water, and longer life of the toilet system. I’ve distilled below a simple, practical maintenance action outcome table to keep you sane and avoid issues.
|
Practice |
How to do it |
Expected benefit |
|---|---|---|
|
Set correct float height |
Adjust float or shank to fill tank to manufacturer’s mark, usually 6–13 mm below the overflow |
Prevents overflow and reduces weak flushes |
|
Use water-saving valve |
Choose valves rated for low flow or dual-flush compatibility |
Cuts water use per flush, lowers bills |
|
Tighten fittings correctly |
Hand-tighten then 1/4 turn with wrench; use new washers |
Stops leaks without cracking tank |
|
Inspect supply line |
Check for kinks, corrosion, and secure connection at shutoff |
Avoids sudden failures and slow leaks |
|
Clean valve parts |
Remove mineral scale from seal, refill tube, and seat with vinegar |
Restores seal function and smooth operation |
|
Replace worn parts |
Swap washers, clips, or the entire valve when brittle |
Prevents intermittent running and hidden loss |
|
Mark settings |
Note float height and refill tube position with a marker |
Simplifies future adjustments and repairs |
|
Schedule checks |
Inspect every 6–12 months, especially in hard-water areas |
Catches small faults before they cause damage |
Water Conservation
-
Select a fill valve that has flow control adjustment or is for low-volume tanks.
-
Install a dual-flush mechanism if your toilet can support it. Match valve fill rates to flush types.
-
Decrease fill time by cutting the refill tube so it does not siphon too much water into the bowl.
-
Plug little leaks fast. A slow leak can leak litres per day.
-
For older tanks where retrofit is possible, use a displacement device to reduce water per flush.
Choose components with flow rates in litres per flush that comply with national guidelines. When everyone in a household understands that they shouldn’t be flushing toilets like garbage cans, the fixture performs as intended and conserves water.
Long-Term Maintenance
Have inspections done quarterly or at least biannually. Examine the shutoff, supply hose, and valve for slow drips or moisture around seals. Clean the valve screen and refill the tube with a mild acid solution if scale builds up.
Rinse parts thoroughly. Change rubber washers every couple of years where water chemistry is aggressive or when they seem to have become flattened. Document the valve’s age. A lot of plastic valves last five to ten years, while some brass units last longer.
Maintain a mini-maintenance log with dates and parts changed to preempt failure replacement.
Preventing Common Mistakes
Don’t over-tighten the locknut under the tank. Apply gradual pressure and sense when it resists more. Adjust your valve height so your water halts at the fill line.
If it is too high, you get spillover; if it is too low, your flush gets weak. Clip the refill tube above the overflow and point it into the refill port. If it is misplaced, it will cause siphoning or slow refill.
After installation, mark the tank water level and valve setting for quick checks later.
Conclusion
The steps above have you prepared to replace a toilet fill valve with little surprises. You close the water, empty the tank, lift out the old valve, install the new one, adjust the water height and flush. Little checks like tightening the locknut and watching for slow leaks save time and money. For silent fills, select a pressure-balanced valve. For water savings, use a low-flow model and adjust the float to its indicated setting. If the valve still leaks or the tank fills weirdly, examine the refill tube, chain length and seat gasket. For consistent outcomes, swap them out at the same time and maintain spare flappers and seals. Give the steps a whirl on your next repair and let me know what did the trick.
Frequently Asked Questions
How long does it take to replace a toilet fill valve?
The vast majority of replacements require 20 to 45 minutes for a DIYer with a basic toolset. Pace yourself and leave additional time for taking out an old corroded valve or for first-time installers.
What tools do I need to replace a fill valve?
You usually require adjustable pliers, a screwdriver, a bucket, and a towel. Some valves come with a nut wrench. No specialized plumbing tools are typically needed.
Do I need to shut off the water before replacing the valve?
Yes. Close the shut-off valve at the toilet base and flush to empty the tank. This inhibits leaks and keeps replacement safe and sanitary.
How do I know if the fill valve is the problem?
Common signs include constant running water, slow refill, or tank not filling. If flapper and float adjustments can’t fix it, fill valve replacement is probably in order.
Can I replace a fill valve without draining the whole house?
Yes. Only the toilet’s supply line has to be turned off. All of the other fixtures are left untouched when you close the toilet shut-off valve.
Will a universal fill valve fit my toilet?
Most newer universal fill valves come close to fitting perfectly. Check the package for tank height range and supply line connection size to ensure compatibility.
How can I prevent leaks after installing a new fill valve?
Compress the fitting hand-tight and then make a quarter turn with pliers. Swap out the tank-to-valve washers if they are old. Test by filling the tank and observing for drips.

Key Takeaways
Heat pumps typically run for a long time in cold weather and this can be normal, particularly for inverter or variable speed…
Key Takeaways
White residue on faucets is primarily caused by mineral deposits from hard water and develops more quickly where water…